rdBPtools Tutorial 2 – Creating a basic Random Meshes Prefab
Last Updated: 30th March 2024
Tutorial was created using rdBPtools version 1.20
rdBPtools comes with 4 Blueprints, 2 based on the high-speed ISM manager and 2 Blueprint Only ones, both provide the same functionality with Randomization and showing/hiding and moving your Actors. The second set I describe more in Tutorial 3.
This first set is a basic “Select Random” actors to show. You can add actors, either all in the root folder, or grouped into separate folders. Each actor, or group can be shown for only certain “themes” and/or with a certain probability.
In this tutorial, we will build a Plant for the Glass-House being used in these examples. The plant will be one of 3 different types, each with equal probability of being chosen.
The assets used here are from the Modular GreenHouse pack on the Marketplace:
https://www.unrealengine.com/marketplace/en-US/product/modular-greenhouse-wood-plastic
Step 1. Select the Actors you wish to have in your Blueprint and collate them.
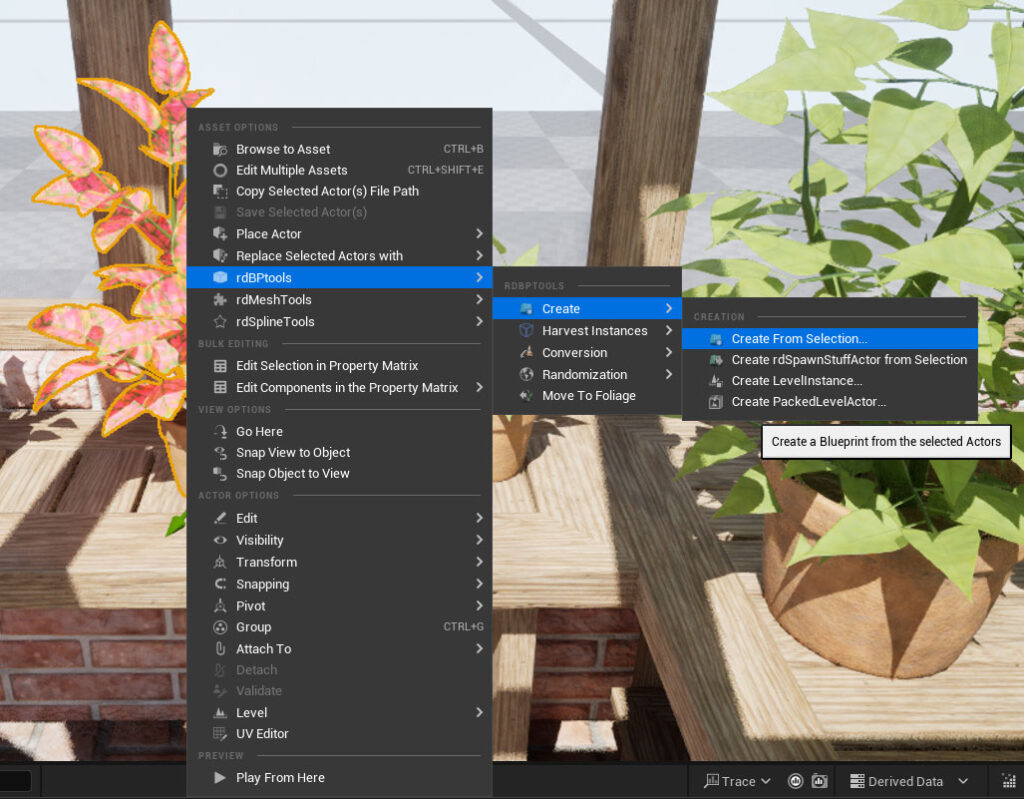
The first step is to select the actors you want directly from the level and collate them into folders – have a root folder if you wish (I find it makes it easier) and a folder for each item (or group of items) you want to have mutually visible, then Right-Click and select “Create from Selection” option in the rdBPtools submenu.
You can choose them from the World Outliner instead if you wish, the Context Menu that opens there is the same as in the Level itself.
Don’t worry about their position as that will be zeroed out in the creation process.
Step 2. Choose the “RandomActor” class and settings.
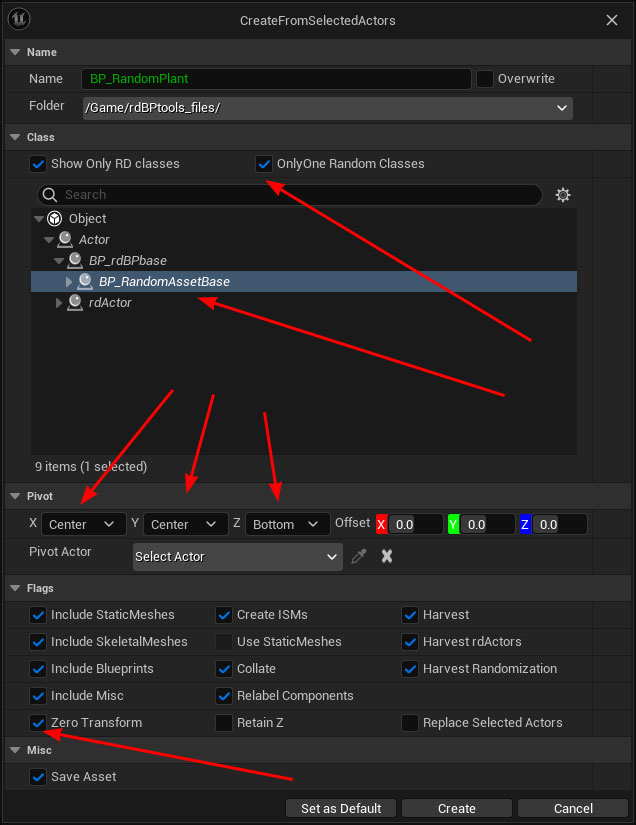
In the window that opens, the first thing to decide is if it will be using Instanced Static Meshes (ISMs) or not. If you do want to use these (and they provide HUGE speed increases) tick the “Create ISMs” box.
You can always create a SubClass off “BP_RandomActorBase” that has your own ISM manager code in as well.
Depending on the ISM option, either choose the “BP_RandomActorBase” (non-rdInst) or “BP_RandomActorBase_rdInst” class in the list that is displayed. That’s a child of rdActor, so you may need to expand that. Otherwise you can search for it in the search box.
For the Pivot, select Center,Center,Bottom.
Make sure that zero transform is ticked to create all the plants in the same place (but not Retain Z – unless the objects you’re adding need to all have their original Z position).
Make sure “Collate” is ticked so the actors are stored in their correct folders.
Step 3. Done! Add to the level.
Now when you add this new Blueprint to your level (or any other Blueprint) you will see one randomly selected Plant from the 3. The Blueprint we used has a button in the details panel called “Randomize” – clicking it will produce a new random selection. By default, that random selection will be used for that instance of the plant. Ticking the “Start Random” will produce a new random one each time.
Just as a sneak-peak into nested Blueprints (See Tutorial 9&10), Creating a Blueprint from that RandomPlant selected in the level along with a pot and some Randomization settings, it can become: