rdBuildBuddy Tutorial 1 – Using Build Buddy
Last Updated: 1st January 2023
Using rdBuildBuddy is very simple. This tutorial is a quick introduction and in it we will create four builds, each based on one of the Placement types.
Step 1. Add the Placement Actors
First of all, we can add some Placement Actors – Add one of each of the Placement types, found in the “rdBuildBuddy/BP_Placements” folder – a Point Placement, a Line Placement, a Box Placement and a Spline Placement.

For the LinePlacement, drag out the end point – for the BoxPlacement, select the Box Component in the Actor (from the outliner) and resize it – and the for SplinePlacement, drag out the spline point and give it some tangent.
Leave all the Placement settings at their defaults (Always loaded, all Missions).

Right, now we have a framework on which we can add our Builder DropIns.
Step 2. Add the DropIn Builders

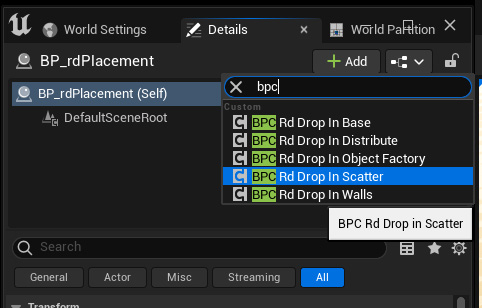
Now lets add a Scatter DropIn to each of the Placement Actors – just select the Actor, and in the WorldOutliner click the “+ Add” button at the top and select BPC_rdDropIn_Scatter from the list:

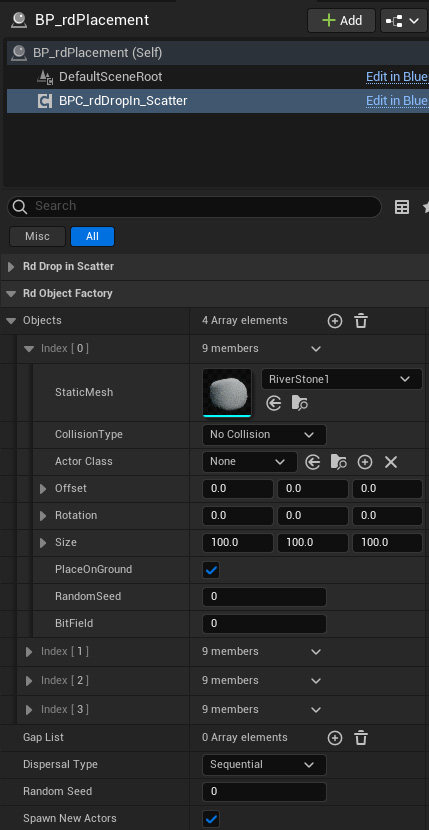
Then with the new component selected, find the “Objects” list in the “Rd Object Factory” section and add 4 elements in the List.
Expand those elements and choose 1 of the 4 SM_RiverStones for each element. Also tick the “PlaceOnGround” checkbox.
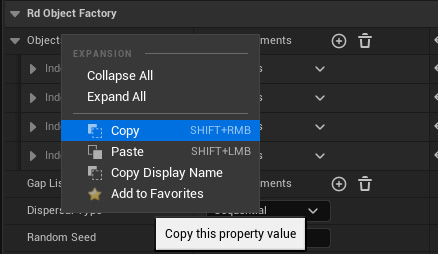
You only have to add these elements to the first Placement Actor. Once you’ve added them, right click on the “Objects” line and select “Copy”.
Then just go to each of the other Placements, select the Scatter Component and Right-Click on the “Objects” line and select “Paste”.

Step 3. Change the Scatter Settings
With all the Objects added to each Placement – you’ll notice that the Box, Line and Spline stones are a bit meh.
Select the Box Placement, select the Scatter DropIn and change the Position Min’s and Maxes to 0.0 – Do this for the Line and Spline DropIns too.
Now they just need their Densities changed – change the Box and Line ones to 0.2 and Spline one to 10.0.
Step 4. Done
That’s it – now your level should look like:
