Section 3. The rdActor

Section 3.1. Introduction

The ArdActor has 5 different modes for handling it’s descendants:

  • None – the fastest, you are in charge of all handling, it just gives you HISMCs for passed in StaticMeshes
  • ShowOnlyOne – when your Actors ChildActors are collated into Folders (USceneComponents attached to the RootComponent) this shows only one folder.
  • Randomization – each actor has it’s unique Randomization settings applied before being added to the level
  • Draw – this is similar to None, but triggers an rdDrawEvent whenever the Actor needs building
  • BuildInstances – just enumerates the FastSettings (Non-random instances) – this slightly speeds up building.

The Randomization mode provides the most power, Randomization settings can be added to any Actor by way of manually adding tags, or you can use the rdBPtools tool from the Marketplace which provides many time saving tools for setting them up.

The Randomization provides:

  • a RandomStream that is shared (default, optional) throughout the chain of Child Actors (and any Parents of this)
  • a Theme system, any Folder or Actor can specify what themes to be shown with (comma separated String)
  • a Reliance system, any actor can rely on the visibility of any other actor
  • the Location can be randomly generated with a specified range of its default Location
  • the Scale can be randomly generated with a specified range
  • the Rotation can be randomly generated with a specified range from its default Rotation
  • there are Probability values for Flipping the actor on any of the 3 axis (values are 0.0 for never, 1.0 for always)
  • there are Probability values for Showing the actor (values are 0.0 for always hide, 1.0 for always show)

Section 3.2. The Nodes and Functions

To see a full set of reference for the Nodes and C++ Functions rdActor has, you can read up on them in the Reference Manual, section on rdActor.


Section 3.3. Setting our Randomization and Instance settings

We needed a convenient way to store the data used for the Randomization and also the StaticMesh Instance settings.

Each different Static Mesh has to be able to have it’s own unique settings – but it couldn’t tie that Mesh to the plugin at all.

The Same with the Randomization, except that data needed to be store in the Actor instances themselves in the level, but also with the ability to over-ride those settings at any stage with settings in a ChildActorComponent.

That’s where UserAssetData comes in, It is a simple Struct that Components have an Array of. We are able to Subclass that Struct and add it to the Components Array.

All we have to do is add a new element to the AssetUserData Array, and assign it’s class to our rdRandomizeAssetUserData Struct. This contains all the settings we need, just expand it out and edit the values to create your Randomization data.

Now we have extended the Actors with our Randomization settings, when the Child Actors and Instances are created, these settings are used as the parameters.

It’s also possible to set these up from Tags, they are then compatible with the Blueprint Only versions of this class.

When Randomizing the Actors/Instances, if an AssetUserData Struct isn’t found – it looks for the tags and creates an AssetUserData from those.

The other AssetUserData Struct of interest is the one for Static Mesh Instances. rdInstAssetUserData. You set these from the StaticMesh Editor, in the Details panel near the bottom. The values should be fairly self explanatory. The Inst Flags is a Bitfield with the Bit Values as described below the image.

With this, all instances created from this StaticMesh will be with these settings.

If you want to use the same StaticMesh, but with different settings, Duplicate the Mesh and change the settings on one.

rdInst_CastShadow 0x00000001 (1)
rdInst_CastStaticShadow 0x00000002 (2)
rdInst_CastDynamicShadow 0x00000004 (4)
rdInst_CastFarShadow 0x00000008 (8)
rdInst_CastInsetShadow 0x00000010 (16)
rdInst_CastHiddenShadow 0x00000020 (32)
rdInst_CastShadowAsTwoSided 0x00000040 (64)
rdInst_CastVolumetrixTranslucentShadow 0x00000080 (128)
rdInst_ReceivesDecals 0x00000100 (256)
rdInst_DisableCollision 0x00000200 (512)
rdInst_CanEverAffectNavigation 0x00000400 (1024)
rdInst_HasPerInstanceHitProxies 0x00000800 (2048)
rdInst_RayTracingFarField 0x00001000 (4096)
rdInst_AffectDynamicIndirectLighting 0x00002000 (8192)
rdInst_AffectDistanceFieldLighting 0x00004000 (16384)
rdInst_Selectable 0x00008000 (32768)
rdInst_ReceiveMobileCSMShadow 0x00010000 (65536)
rdInst_SelfShadowOnly 0x00020000 (131072)
rdInst_CastContactShadow 0x00040000 (262144)

rdBPtools has excellent tools for editing these settings, for single, bulk and instances – it’s well worth checking out.

rdInst version 1.43 also has the “Instance Settings” window built-in too, so to change instance settings, just right-click on the asset in the Content Browser and Select “Instance Settings”.


Section 3.4. Initializing your Actor

The first step is to create your Blueprint with rdActor as the Parent Class, it’s easiest just to search for it I’ve found, just “rda” should be enough. Then give it a name and away we go.

You can of course SubClass off another Blueprint you’ve created which SubClasses off rdActor – in fact this can be a powerful way to go forward.

There’s not a lot of work needed to set your Actor up, basically you just need to tell it what ActorMode to use and then start adding Instances.

There are 5 Modes:

  1. None – No Instance Managing will be done at all on this Actor – you’re on your own…
  2. OnlyOne – Organize your actors into folders – in this mode, only one randomly selected folder of actors will ever be visible.
  3. Randomize – Processes all children actors and applies their Randomizations before placing in the level.
  4. BuildEvent – User-made, triggers an rdBuildEvent event in the Blueprint where you can process your actors.
  5. BuildInstances – Similar to Randomize, but only processes the non-randomized instances for a slight increase in speed.

Now you can set whether you want to use the built-in arrays for the instances (you just add/edit items in these arrays and rdActor takes care of setting up and managing the instances), or to add/edit instances directly with the rdActor Nodes and Functions.

There are some other useful things that rdActor can do behind the scenes too, check out these settings:


Section 3.5. Adding Managed Instances

The first type in Instance we’ll go over are the Managed Instances. These are associated with your Actor and are cleaned up when removed or hidden and built when constructed or changed.

rdActor maintains a Map of StaticMeshes and their desired Instance Transforms and details such as their Folder and Randomization settings. These are turned into real Instances at the appropriate times.

So all we have to do is add the Instance Information we want to that Map. There are some Utility Methods built-in to make that easy.

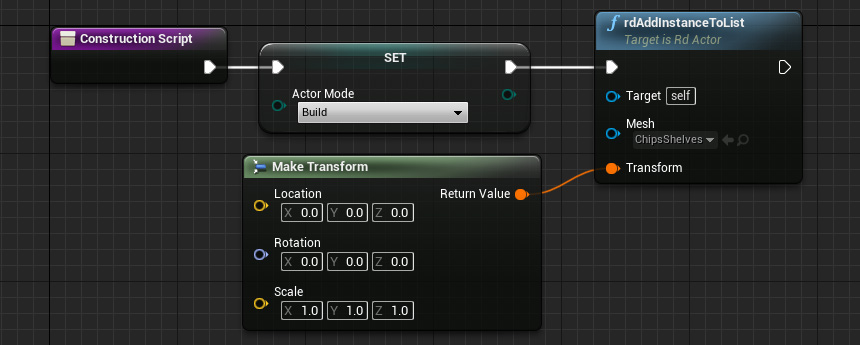
The First just adds a single Instance to the list with it’s transform:

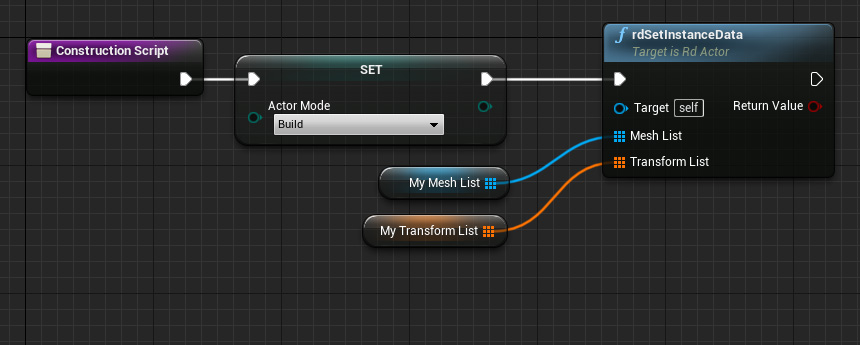
The next Utility method adds an Array of Static meshes combined with an Array of Transforms. These are parsed into Static meshes and added to the Instance List. You can just add as many Instances to those Arrays.

If you’re working with rdBPtools – it automatically converts StaticMesh Actors into Instanced Static Meshes using these routines – it can make the whole process of building assets extremely quick and easy, not to mention much more powerful than a static scene.


Section 3.6. Adding Un-managed Instances

It’s just as easy to add Un-managed Instances and rdActor has some Utility Methods to do this.

The first, again is a simple method to add a single Instance:

This returns the index of the new Instance. As this is un-managed, you’re in charge of cleaning up these instances in some way.

The next way is the fastest way of adding Instances. You get a reference to the actual Component that makes the instances, so you can add as many Instances as you want straight to it:


Section 3.7. Transforming an Instance

It can save cycles to transform existing Instances rather than recreate them, so there are some helper methods for this. An example of how they can be used is in a Door Blueprint, the opening and closing can be done straight to the instance involved. That’s how the doors work in the rdBuildBuddy Room system.

This is the Construction Script from the Door Blueprint:

BP_Door just constructs one Instance – for the Door Mesh

Then, all that needs to be done is set the door rotation when it’s opening or closing, it looks like this:

You can also do bulk transforming for faster times: