Section 3.1.2: LOD Tasks
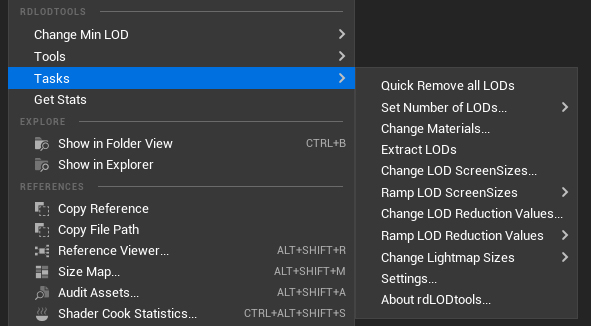
The Tasks menu contains various tasks for quickly changing your LODs and your meshes.
Depending on the selection, you will see different options. The snapshot to the left shows the options you get for a standard selection where all selected meshes have the same number of LODs.
The LOD Vault
Before describing each of the tools, now is a good time to learn what the LOD Vault is.
It started when I found I was using similar ScreenSizes and Triangle Reduction settings for a lot of various meshes. Most of the trees for instance, have 6 LODs and are spread out in a similar way where-as smaller desert plants have 5 LODs and a different spread. This applied to most of the meshes I was working with. I wanted a way to be able to use the same values without having to write them down somewhere and keep entering them.

So I built the LOD Vault. It saves all the ScreenSizes and Triangle Reductions for any number of LODs in a mesh. When you use one of the task tools, you can load any saved set in your vault – it will use the correct set depending on the number of LODs in your mesh. You can have an unlimited number of different sets, each uniquely named.
The LOD Vault is saved within your project, so you can use different sets for different projects. You can also import Vaults from other projects into your current project (from the settings window).
To save new sets into the Vault is easy, from any of the tools that use it, there will be a text-box for the name (if it exists, the name will be in red, if not, it will be green). Just hit the “Save to Vault” button – bottom/right of the window. If it is disabled, it means the named item already exists (is in red) so you will need to tick the “overwrite” tickbox.
To load a set from the vault – just select it in the top Drop-down.
1. Quick Remove all LODs
This is a very quick way to remove all LODs except for LOD 0 (the main mesh LOD). It displays a confirmation dialog, and if “Yes” is selected, all selected meshes will have their LODs cleaned out. Note that this cannot be undone, so caution is advised.
2. Set Number of LODs
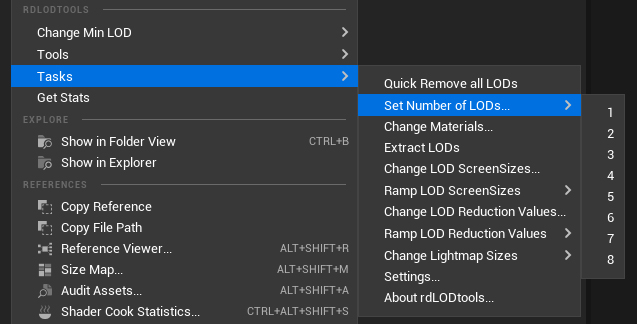
This tool allows you to easily add new LODs or remove existing LODs from the selected meshes.
The tool is intelligent enough to work out the Base LODs (LODs that contain imported mesh data) and Billboard LODs , and focus on removing reduced versions of that if they exist, or in the case of inserting new LODs, it inserts them between existing Base LODs and before Billboard LODs.
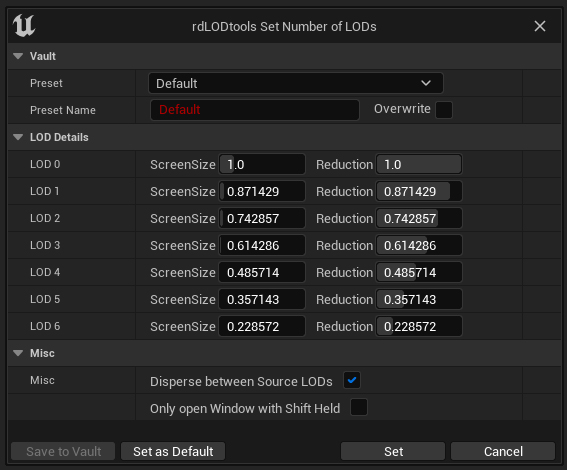
A Window opens that lists the Screen Sizes and Reduction Amounts to use.
If there is only one mesh selected, the values are filled in from the mesh itself, otherwise the values shown are from the defaults set for this tool (“Set as Default” button).
You can also select any of presets from your LOD settings Vault.
If “Disperse between Source LODs” is ticked, any new LODs will be dispersed between Base LODs and before any Billboard LODs (assuming additional LODs are needed).
You can tick the “Only open Window with shift Held” option to not display this window and to immediately set all selected LOD’s to the current Default values set up previously (can save a number of mouse clicks). Holding down the shift key while you select this option from the menu will still open the window. (There is also an option in the settings window to reset all task windows to open).
3. Change Materials
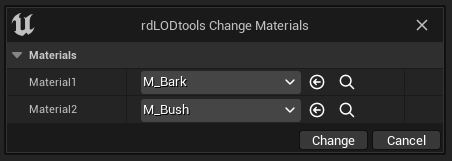
This tool allows you to change any or all of the materials in the selected meshes.
If the mesh doesn’t have that many materials, the remaining ones are ignored.
4. Extract LODs
This tool has no window, it just extracts each of the Base LODs (the LODs that have source mesh data) from the mesh and saves them as their own meshes. Each of the meshes is suffixed with “_LODx” where x is the LOD number. Any existing meshes with that name are over-written without asking, so be careful to check first.
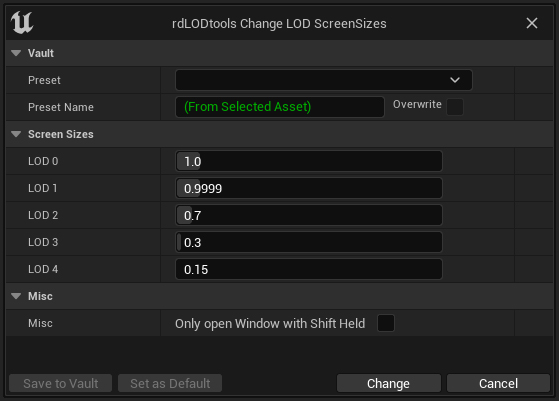
5. Change LOD ScreenSizes
This tool only shows when all the selected meshes have the same number of LODs. This provides you with the ability to change each of the ScreenSizes of the LODs in all selected meshes.
When only one mesh is selected, it uses the ScreenSizes from that mesh as the defaults, otherwise it uses what you’ve previously set as the defaults.
You can choose any ScreenSize sets you’ve saved in your Vault by selected it in the Preset Drop-Down.
6. Ramp LOD ScreenSizes
This task ramps the selected meshes LODs ScreenSizes up or down by the selected amount. No window is opened and there is no undo.
7. Change LOD Reduction Values
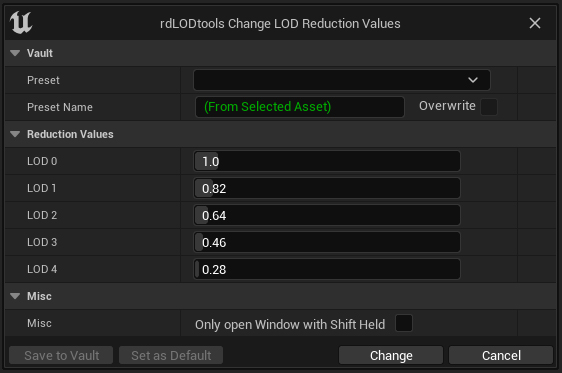
This tool only shows when all the selected meshes have the same number of LODs.
When only one mesh is selected, it uses the Reduction Values from that mesh as the defaults, otherwise it uses what you’ve previously set as the defaults.
You can choose any Reduction Value sets you’ve saved in your Vault by selected it in the Preset Drop-Down.
8. Ramp LOD Reduction Values
This task ramps the selected meshes LODs Triangle Reduction amount up or down by the selected amount. No window is opened and there is no undo.
9. Change LightMap Sizes
This task changes the selected meshes LightMap size to the selected size from the selected value. There is no window opened and no undo.
10. Rename LOD set
This tool only shows when all the selected meshes are a LOD set (i.e. are suffixed with _LODx).
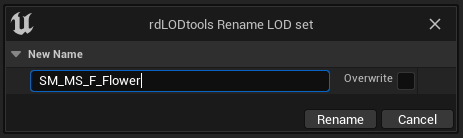
It renames all the LODs to the specified name (suffixing with the original _LODx).
11. Combine LODs
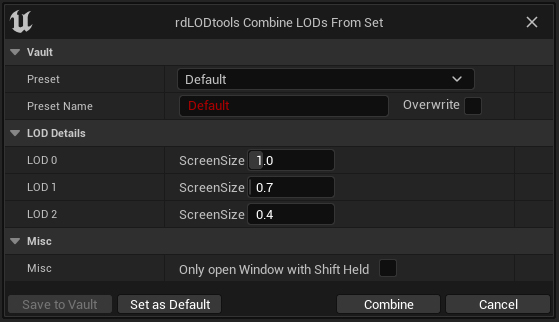
This tool only shows when all the selected meshes are a LOD set (i.e. are suffixed with _LODx).
All the selected LODs are combined into a new mesh. You can select the ScreenSizes and Triangle Reduction Amounts from the window that opens or use a preset from your Vault.
12. Settings
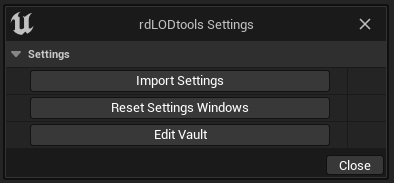
Opens the settings window. From here can can:
1. Import your Vault and tool settings from another project.
2. Reset all the task windows to open by default rather than just execute.
3. Edit the contents of your Vault.
13. About
Opens the About window which displays the current rdLODtools version.