rdTexTools Tutorial 1 – Optimizing Megascans 3D Plant Materials
Last Updated: 17th April 2023
Tutorial created with rdTexTools v1.00
Note: Megascans has added channel packing as a default option for a lot of their textures now, including the Hyrangea used in this tutorial – their Trees have channel packing and are a little different too.
This tutorial was written for older style MS materials, or MS materials downloaded from UE4/5 in non-packed ways.
It is also compatible with many other types of textures you can find on the internet or the marketplace, so following this tutorial can still be very helpful in learning how to reduce memory by channel packing.
You can optimize the newer MS textures too, I will try and write a new tutorial about that (along with foliage health and seasons for trees and shrubs).
Introduction
Quixel and Epic have provided us with some excellent high quality assets with their Megascans collection.
They have very high detail and high resolution textures. This is great because we get to choose the level of detail we can have in our games. The more optimized each asset is, the more of them we can have in-game.
This tutorial shows you how easy it is to get a huge reduction of resource space, both disk and GPU by using rdTexTools to optimize the textures.
In fact with almost all the Megascan plant materials, it’s possible to get the same reduction as here – down to 30% of the GPU resources and down to around 30% of disk resources for each material with almost imperceptible differences in quality! That’s 30% of the 2Mb Materials, it’s even more than that for the 4K and 8K Materials.
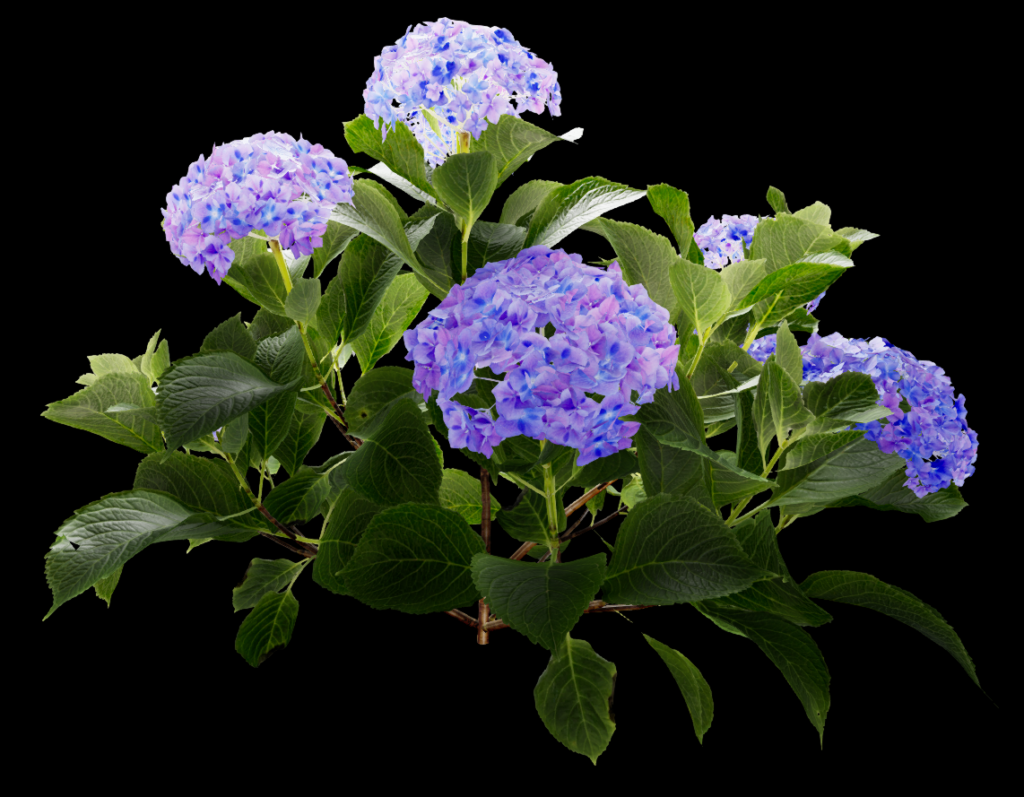
This tutorial uses the Megascans Hydrangea asset with 4K textures, the same savings come if you use 2K or 8K.
The goal is to get the texture sets down to around 5Mb for each asset.
This is a good size for having a large amount of varied assets on the highest end graphics hardware out in 2021/2022. Most cards have about 8Gb GPU memory – the higher end ones can have up to 24Gb (GTX3090ti).
- The XBox 1 has 8Gb GPU memory
- The PS4 has 8Gb memory shared memory with the CPU
- The XBox X series has around 10Gb usuable GPU memory (it has 16Gb shared memory with the CPU).
- The PS5 has 16Gb shared memory with the CPU
This is the maximum size of course, for older hardware there are the scalability options to lower textures sizes and other performance tweaks.
Each game/project differs so you’ll need to consider your projects attributes to find the best sizes.
Using the scalability, I find having the texture sets at around 800Kb to 1Mb on older hardware (e.g. GTX1080ti which has 11Gb but slower bandwidth) gets a good number of objects on screen without draining too many resources.
If the asset is a feature in game rather than background scenery it can be higher resolution as the players attention will be focused on it more.
For the tutorial we are just using the textures and meshes, imported straight into UE and creating simple materials. The tutorial can’t really show Quixels proprietary shader code. The snippets shown can be added to their Blueprints though.
For most applications it can be a lot easier to use the Quixel Bridge plugin to directly import the meshes and full materials. The meshes have all the LODs installed and the materials include a lot of powerful adjustments. Quixel and Epic have just recently released a powerful shader system to add season and health to foliage – well worth checking out.
A note about the meshes and static lighting builds – sometimes you will need to increase the default “Min Lightmap Resolution” from 64 to 128 (512 for the Hydrangea) when importing foliage meshes – whether using the Bridge Plugin or directly importing. If not, a lightmap UV map cannot be built and strange things will happen when building the lighting.
The textures for this plant are:
Diffuse – RGB, 10.67Mb GPU, 26.1Mb disk
Normal – RGB, 21.33Mb GPU, 28.6Mb disk
Opacity – Grey, 8Mb GPU, 2.12Mb disk
Rough – Grey, 10.67Mb GPU, 12.2Mb disk
Trans – RGB, 10.67Mb GPU, 27.2Mb disk
Total – 61.33Mb GPU, 96.3Mb disk
Step 1.
As described in the rdTexTools manual – we only loose a small amount of detail by converting the materials Roughness and Opacity to use BC1 compression so both these textures can be combined into one RGB texture using BC1 compression:
- Double click on one of the Hydrangeas textures (eg the Diffuse).
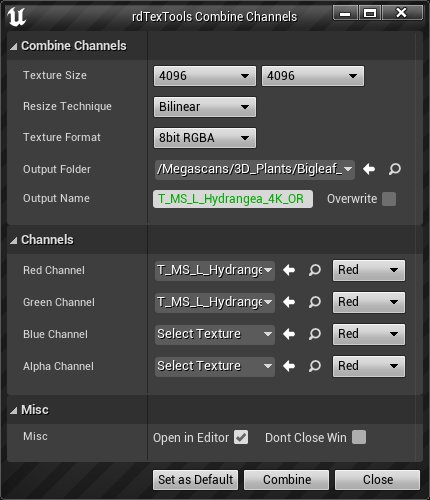
- From the Texture Editor, choose “Combine Channels” from the rdTexTools toolbar menu.
- Choose the Hydrangea Opacity Texture for the Red Channel
- Choose the Hydrangea Roughness Texture for the Green Channel (the green channel has 6bits)
- Make sure you have an appropriate name for the output texture
- Click “Combine”
This removes the Opacity and Roughness Textures from the Material and adds the OR (Opacity+Roughness) texture:
Diffuse – RGB, 10.67Mb GPU, 21.61Mb disk
Normal – RGB, 21.33Mb GPU, 28.6Mb disk
OR – RGB, 10.67Mb GPU, 14Mb disk
Trans – RGB, 10.67Mb GPU, 27.2Mb disk
Total – 53.34Mb GPU, 91.41Mb disk
So it has reduced the GPU memory by 13.04% and disk by 5%
You also need to edit the materials blueprint to use the new combined channel texture:
Step 2.
Now we set up the material
- Open the Hydrangea’s Material in the Material Editor
- Go down the list of details on the right of the editor until you see the Master Material (it will be “Foliage_Material”) and then go to it or “Browse” to it – normally it’s in “Content/MSPresets/Foliage_Material”.
- Duplicate the Parent Material and call it something like “M_Foliage_Material_rdTex”
- Open it in the Material blueprint editor
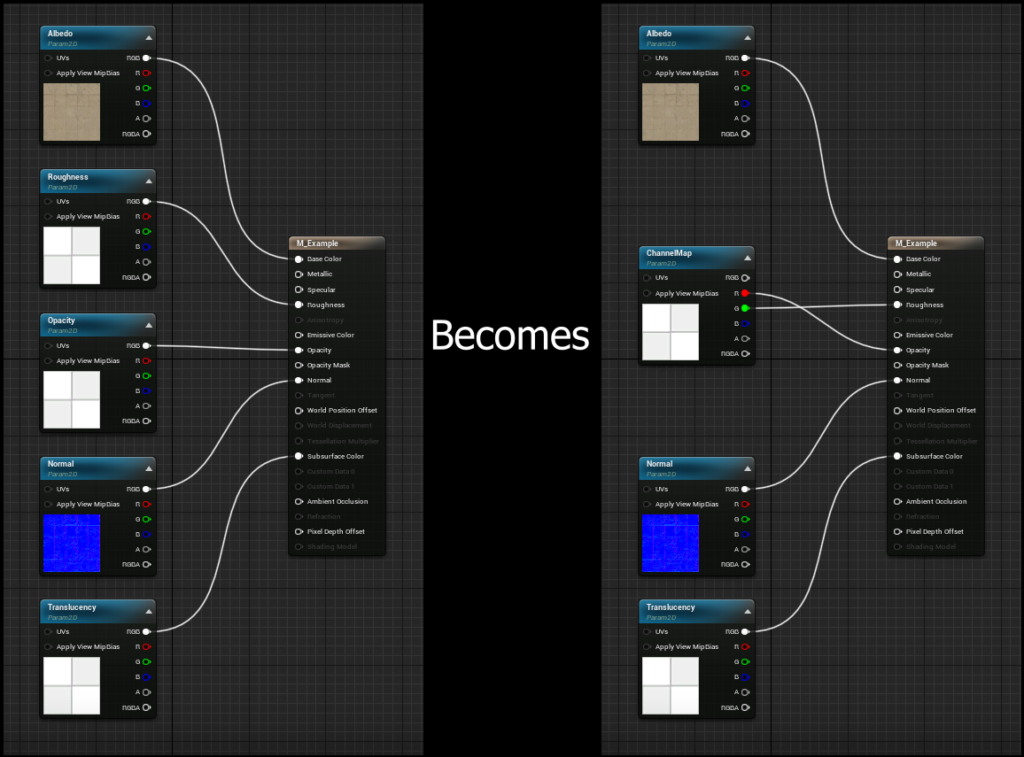
- I can’t show their Material in this document, but you will see that there are Texture Samplers for Roughness and Opacity, delete both of them
- Add a new Texture Sampler, convert it to a Parameter and call it something like “ChannelMap”, set it’s Sampler Source to “Shared: Wrap” and set the default texture to the “DefaultWhiteGrid” like the others
- Wire the Red output to the Opacity (where the original was wired)
- Wire the Green output to the Roughness
- Go to the Hydrangeas Material again, and change the Master Material to our new “M_Foliage_Material_rdTex” master.
- Set the “ChannelMap” parameter to the OR texture created in step 1.
- Done!
This is a simple Material to illustrate the changes, it can be applied to the Megascans materials too.
How much difference to the rendering does this make?
Taking a snapshot of the scene before making the changes and after (exact same position/rotation, no bloom, no Auto-Exposure and FSAA) and running them through the rdTexTools DiffMap tool we can see the difference:

There is a small difference, the Hue has only changed 0.61% which is good and the rest is only just noticeable in the difference map.
Step 3.
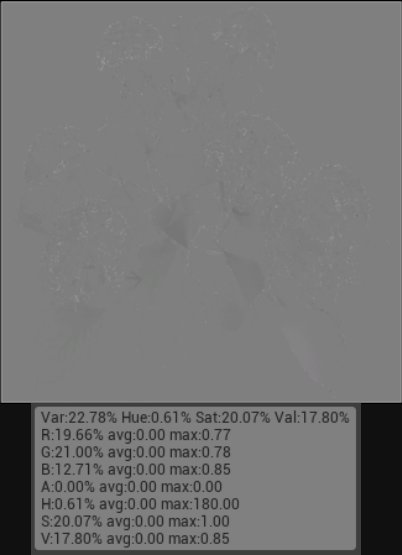
If we have a good look at the transparency map (the colors that show through foliage behind the light source) we can find ways to optimize that too.
- Open up the “Create DiffMap” window from the Texture Editor rdTexTools toolbar menu
- Select the same size as the original (4096×4096), 8 or 16bit Greyscale as the Format and a name
- Set Texture1 as the Hydrangea Diffuse texture
- Set Texture2 as the Hydrangea Translucency texture
- Set the Mask as the Hydrangea Opacity texture (so it just works with the actual pixels that are rendered)
- Set “Difference” as the “Difference” Type
- Click “Stats”
This shows that there is a very minimal amount of Hue change going on (0.12%) and the maps only differ in lightness
This means it’s a great candidate for a 1 channel difference map instead of the 3 channel RGB map.
There is a little loss in the sub-surface color, in the original the light-green is more vibrant than with the 1 channel map but this can be adjusted by changing the SSS Color Intensity and SSS Color Tint options in the Megascans material instance.
Step 4.
Now we create a 1 channel difference map of the Hydrangea Translucency map.
- Open up the “Create DiffMap” window from the Texture Editor rdTexTools toolbar menu
- Select the size you want the map to be (4096×4096 for this example), 8bit Greyscale as the Format and a name
- Set Texture1 as the Hydrangea Diffuse texture
- Set Texture2 as the Hydrangea Translucency texture
- Set “Difference” as the “Difference” Type
- Click “Create”
Now we have a single channel greyscale texture of the differences between the two maps.
Step 5.
Seeing as we have already created a packed channel texture which has the red channel free we can insert this Translucency channel texture into that.
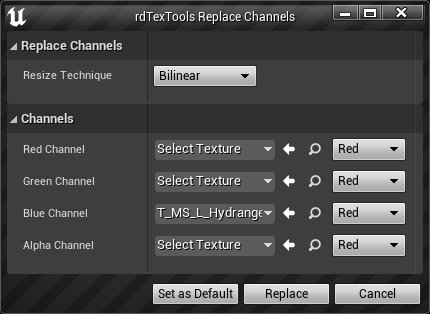
- Open up the T_Hydrangea_OR texture (or what ever you called it in step 1) in the Texture Editor
- Select “Replace Channels” from the rdTexTools toolbar menu
- Select the Single-Channel Translucency map you made in step 4 for the Blue channel – as it’s greyscale just use the Red source channel
- Click “Replace”
Now we have inserted that data into our packed channel texture – no extra memory is added to the GPU mem, and the original Translucency map can be removed freeing up more memory.
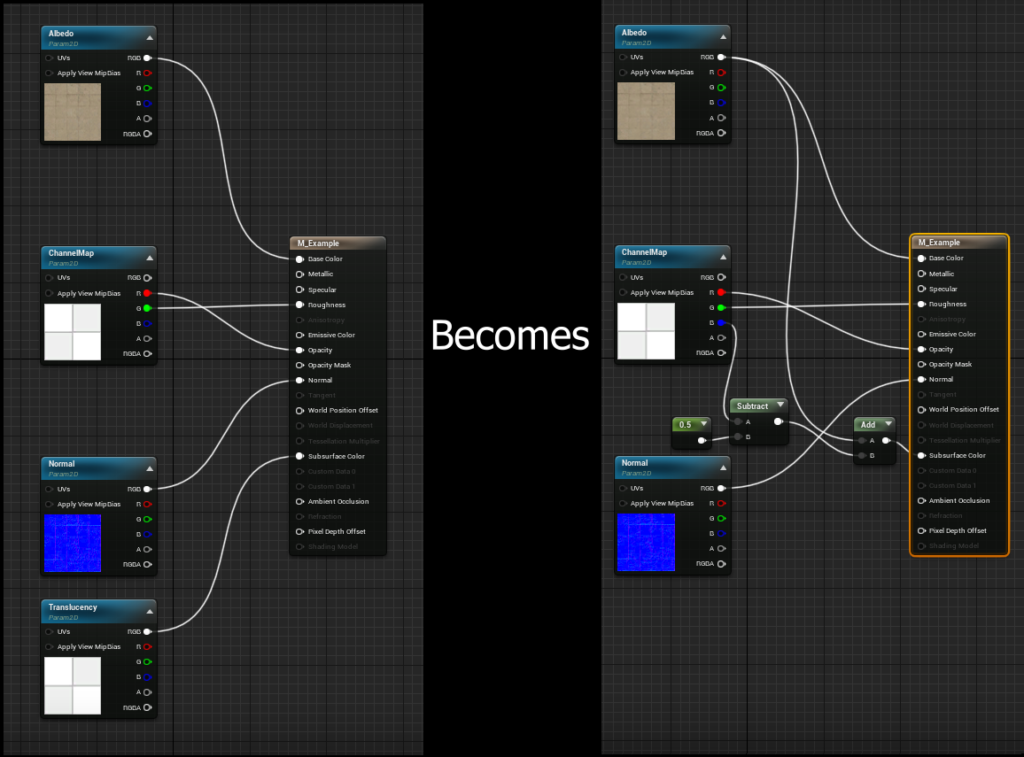
Step 6.
The last step for this bit is to change our already modified master material to use that channel and do the difference calculation on it.
- Open up the new Foliage Master Material you made in Step 2.
- Delete the Translucency Texture Sampler.
- Drag a wire out from the output from just before the Material Outputs Diffuse (from after the speedtree color variation) and add a “+” node.
- Drag a wire from the Blue Channel of the ChannelMap and hook it up to the second parameter of the “+” node.
- Drag out from the output of the “+” and add a “Saturate” node.
- Drag out from the output of the Saturate and hook up to where the original Translucency was.
So now we have removed 3 textures and added one, the running total is now:
Diffuse – RGB, 10.67Mb GPU, 21.61Mb disk
Normal – RGB, 21.33Mb GPU, 28.6Mb disk
OR – RGB, 10.67Mb GPU, 14Mb disk
Trans – RGB, 10.67Mb GPU, 27.2Mb disk
Total – 42.67Mb GPU, 64.21Mb disk
So it has reduced the GPU memory by 30.44% and disk by 33% – All for very little loss in quality

So what else can be done to optimize this material?
It turns out that some of the textures can be sized down by quite a bit without loosing any visual detail. This can be done by either setting a “LOD Bias” or by re-sizing the texture with rdTexTools, when possible it’s best to use the LOD Bias as it retains the original higher res data where re-sizing it looses it.
The first texture to try and optimize is the Normal map – the Original 4K map takes 21.3Mb of memory – if we set the LOD Bias to 2 (1024×1024) it drops to 1.3Mb of memory – the normal detail is slightly reduced, but not by that much – the savings of 93.77% make it a good candidate for reducing!
The next one to try is the ORT map (our packed channel texture) – you can reduce this down in size too – it can be reduced to LOD Bias 1 (2048×2048) without much lose. The original is 10.67Mb, at LOD Bias 1 it’s 2.67Mb – another saving of 75%.
The last texture left is the Diffuse – as the normal, roughness etc change the diffuse so much, it’s possible to reduce the size of the diffuse map too without loosing much – setting the LOD Bias to 2 (1024×1024) gives good results while reducing the memory from 10.67Mb to 0.67Mb – savings of 93.72%
So the original (4K) was 61.33Mb GPU and 96.3Mb disk and our optimized material is now 4.64Mb.
We could have done the same with the 2K ones (just doesn’t give the option to go higher if you want later), the original would have been 15.33Mb and optimized the same at 4.64Mb giving a size 30% of the original.


Of course, not all the optimizations have to be made – just the ones that fit your materials and your scenes – you will still save a lot of memory and disk space.
When optimizing Foliage, and any type of texture that has very thin parts using masks – you may find that when viewed from a distance, it appears to fade out and disappear – it happens on things like grass (e.g. BasketPlant).
The reason it does this is because the Opacity Mask gets interpolated in lower Mip-Maps, and looses the “solid” parts.
You can get it back up and running nicely at a distance by changing the “Mip Gen Settings” of the Opacity Map (or in the case of this tutorial, the OR Map (Opacity + Roughness)) to “Unfiltered”.