rdSplineTools Tutorial 6 – Snapping Spline points to Mesh Sockets
Last Updated: 8th August 2023
Tutorial created using rdSplineTools version 1.00
Another tool in rdSplineTools is the “Snap to Socket” tool. When dragging control points in your spline, hold down the “z” key, and if your point is dragged close to any socket in your spline meshes it will snap to it. If you hold down “z” and “x” at the same time while dragging – instead of using the default snap code it calls a custom Blueprint function which you’re in charge of implementing.
This tutorial explores both types:
Step 1. Create a StaticMesh for your Spline with sockets on it.
For this tutorial I’m using one of the Road meshes from my Road pack. It has sockets along the ends to match up with the various meshes with different numbers of lanes.
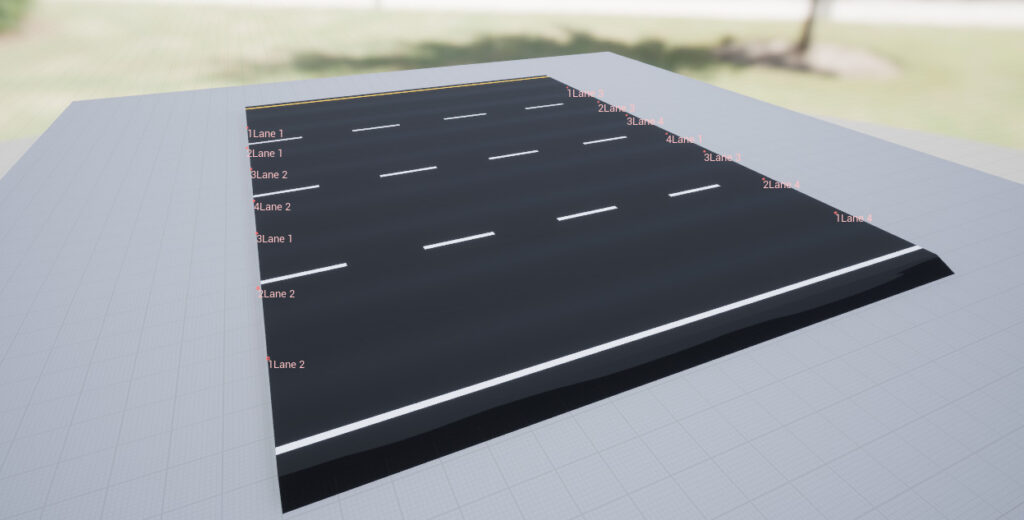
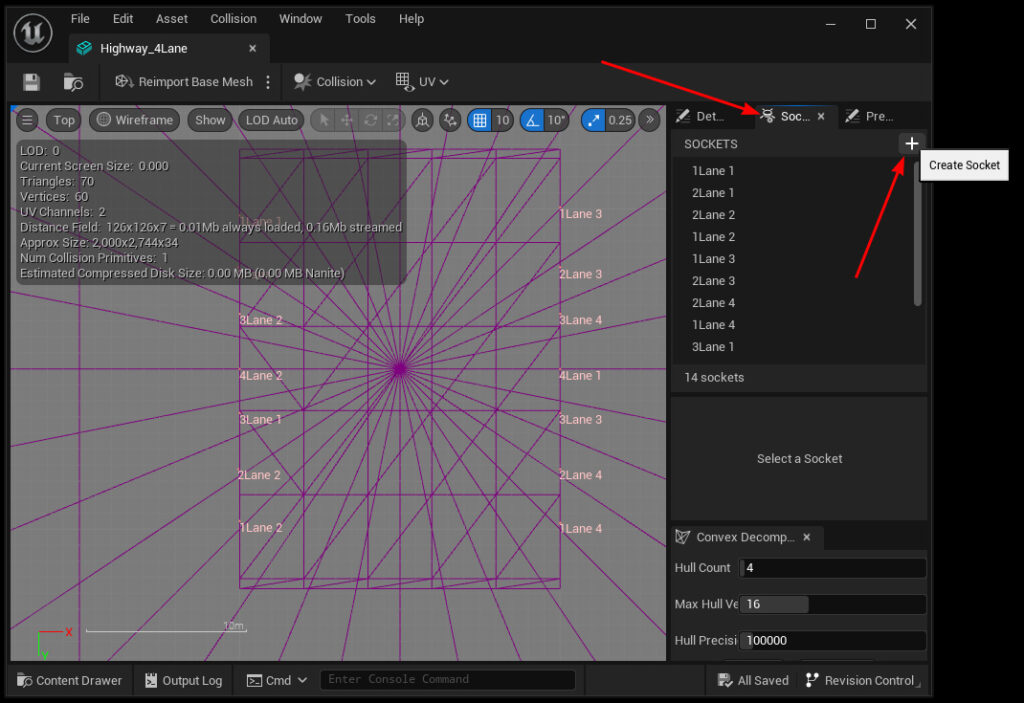
Any mesh you intend to use with your spline is OK, just add the sockets from the StaticMesh Editor:
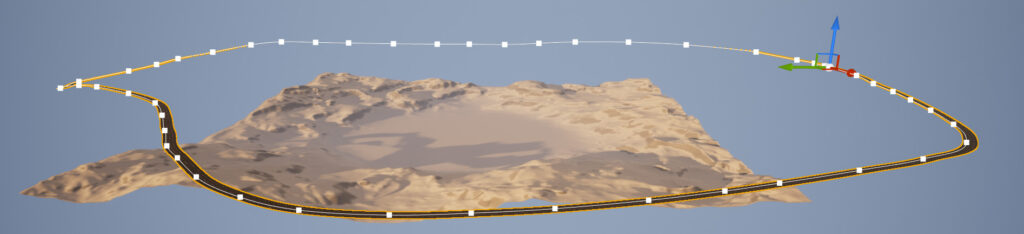
Step 2. Set up a Spline Using our Socketed Mesh.
Add a spline to your level with your Spline Blueprint (or use the one from Tutorial 5) and set it to use the mesh that you’ve added some sockets to. If you want, scroll down to the bottom of this page and select all the text there – that’s for a very large spline for a road, but it’s a good test (it’s actually the arterial road in my game). Copy that to clipboard and Right-Click on your Spline BP and select “Create Spline from Clipboard data”.
Step 3. “New Spline Here” from the rdSplineTools section of the Spline Menu.
Create a new Spline for our second road with the “New Spline Here” tool:
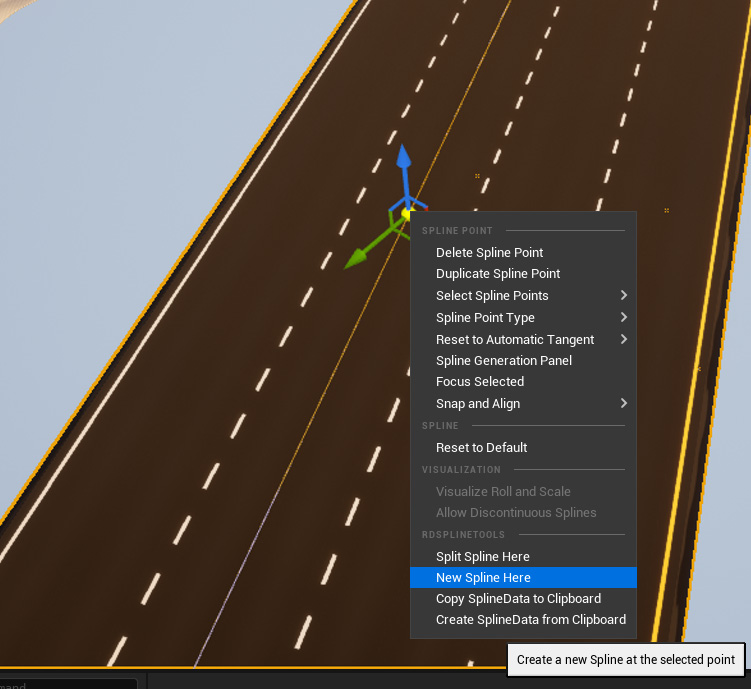
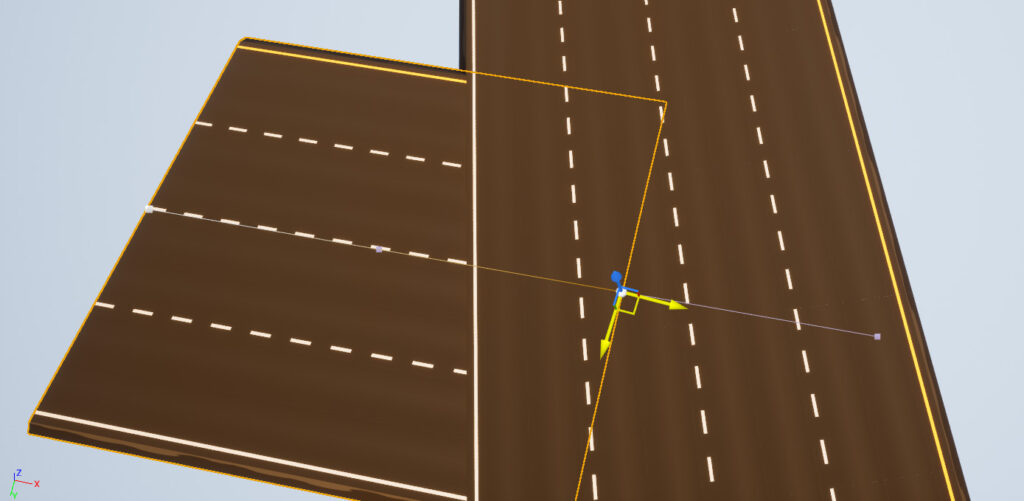
Step 4. Drag the start point of the new Spline while holding Z near your sockets.
Right, that’s it – now when you drag the spline point while holding “z” it snaps to where the sockets are on the mesh.
Step 5. Add a new Function to your Spline Blueprint.
Now we’re going add a custom function to the blueprint where we can control where the point snaps to when both “z” and “x” are held down while dragging. (make sure in and out parameters are exact and “Call in Editor” is ticked)
The Function is called “rdGetClosestSocket” – make sure no spaces or capitalization is done by the editor. Make it have 3 float inputs and 3 float outputs.
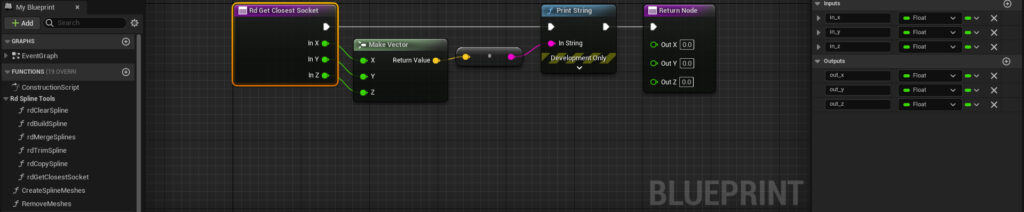
When this function returns 0,0,0 – it means no socket was found – when it returns non-zero values for at least one it will snap to that.
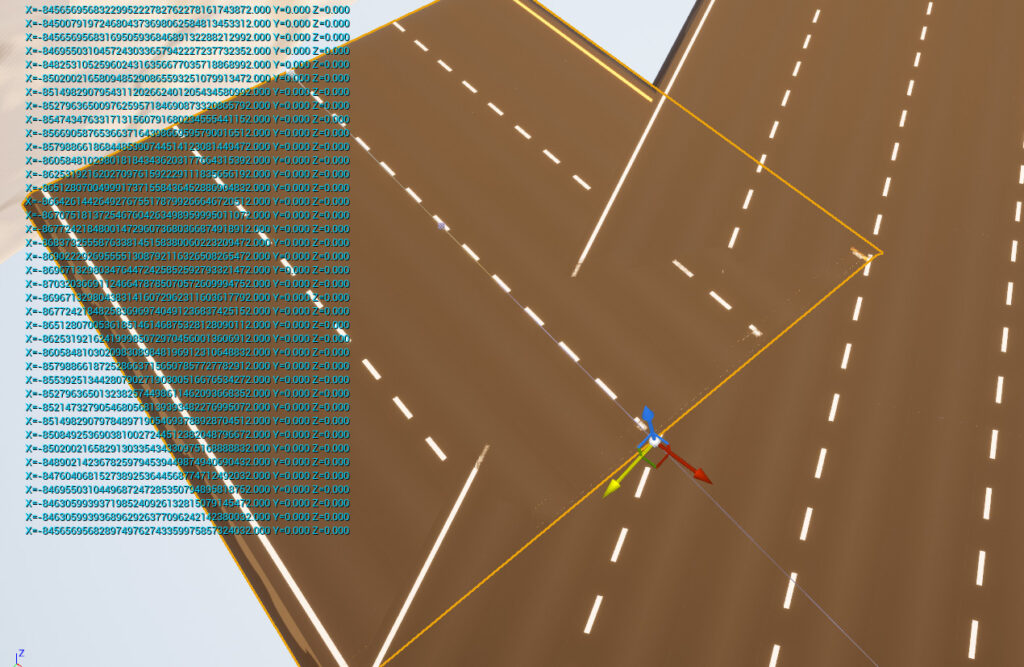
Step 6. Test by holding z and x while dragging the Spline point.
When dragging the new spline point now, you’ll see logging on screen with the passed in values.
rdSplineData|1|49|0:-64753.358157:8035.225245:370:34750:-4460:0:34750:-4460:0:3:0:0:0:1:1:1|1:-26149.999999:2123.017741:370:16947.97359:-3579.208923:0:16947.97359:-3579.208923:0:3:0:0:0:1:1:1|2:-12596.998956:-192.337149:369.999995:13075.000112:-598.366711:-70.000002:13075.000112:-598.366711:-70.000002:3:0:0:0:1:1:1|3:-3796.08247:-649.985261:230:12070.838562:-615.596458:-185:12070.838562:-615.596458:-185:3:0:0:0:1:1:1|4:25567.458947:1100.506971:0:24315.846399:3103.670688:-281.354319:24315.846399:3103.670688:-281.354319:1:-0.000407:0.065453:0.006208:1:1:1|5:44835.610327:5557.356115:-332.708638:19740.41017:4945.660939:69.021945:19740.41017:4945.660939:69.021945:1:0.000194:0.122433:-0.001685:1:1:1|6:65048.279287:10991.82885:138.04389:18365.144217:5207.773207:346.493819:18365.144217:5207.773207:346.493819:3:0.00125:0.137713:-0.008988:1:1:1|7:81565.898762:15972.902528:360.279001:16785.860357:5284.085575:205.978055:16785.860357:5284.085575:205.978055:1:0.000889:0.151894:-0.005784:1:1:1|8:98620:21560:550:17377.318409:6080.179525:96.385286:17377.318409:6080.179525:96.385286:1:0.000414:0.155532:-0.002632:1:1:1|9:116320.535581:28133.261579:553.049574:17947.183837:7464.977415:1.524787:17947.183837:7464.977415:1.524787:3:0.000008:0.195813:-0.000038:1:1:1|10:134242.825889:38521.483958:553.049574:26247.816162:20060.022585:58.475213:26247.816162:20060.022585:58.475213:3:0.000284:0.320522:-0.000838:1:1:1|11:148191.211494:57901.530948:670:11061.602892:18523.346541:60.036141:11061.602892:18523.346541:60.036141:1:0.000633:0.473556:-0.001178:1:1:1|12:156366.031674:75568.177041:673.121855:8545:18555:0:8545:18555:0:3:0:0.539306:0:1:1:1|13:164389.325404:94283.979482:670:6279.365447:15032.59305:-1.560928:6279.365447:15032.59305:-1.560928:1:-0.000028:0.557279:0.000041:1:1:1|14:168924.762568:105633.363142:670:4725.551085:12762.306422:-10.005645:4725.551085:12762.306422:-10.005645:1:-0.00022:0.578243:0.000311:1:1:1|15:173840.427575:119808.592325:649.98871:4633.871632:15221.651574:-10.005645:4633.871632:15221.651574:-10.005645:3:-0.000187:0.595302:0.000253:1:1:1|16:178156.545674:135580.714873:649.98871:3318.041763:14512.071562:-29.723828:3318.041763:14512.071562:-29.723828:1:-0.000613:0.614077:0.000788:1:1:1|17:180476.5111:148832.735448:590.541054:1859.461288:12979.409797:-29.723828:1859.461288:12979.409797:-29.723828:1:-0.000666:0.651388:0.000776:1:1:1|18:181875.468249:161539.534466:590.541054:385.199241:15907.440658:4.729473:385.199241:15907.440658:4.729473:3:0.000104:0.698496:-0.000106:1:1:1|19:180767.585244:176515.062454:600:-2701.255893:13543.209673:114.729473:-2701.255893:13543.209673:114.729473:1:0.003291:0.762978:-0.002788:1:1:1|20:176472.956463:188625.953812:820:-6479.519896:12750.613408:225:-6479.519896:12750.613408:225:1:0.007771:0.856118:-0.00469:1:1:1|21:167808.545453:202016.289269:1050:-10695:12050:365:-10695:12050:365:3:0.010329:0.912028:-0.004643:1:1:1|22:158226.386076:212302.861597:1550:-8518.409616:8938.000772:381.134708:-8518.409616:8938.000772:381.134708:1:0.012154:0.927026:-0.004914:1:1:1|23:150771.72622:219892.290812:1812.269416:-9297.682379:8042.346922:334.524626:-9297.682379:8042.346922:334.524626:1:0.012878:0.92854:-0.005145:1:1:1|24:139631.021317:228387.555441:2219.049251:-12144.044684:10459.315308:368.389917:-12144.044684:10459.315308:368.389917:3:0.010772:0.93741:-0.003999:1:1:1|25:125246.966044:239521.941287:2549.049251:-14588.326296:12033.649862:255.475374:-14588.326296:12033.649862:255.475374:1:0.00594:0.93649:-0.002224:1:1:1|26:110454.368725:252454.855164:2730:-15355.514631:16971.883808:-74.524626:-15355.514631:16971.883808:-74.524626:1:-0.001484:0.913052:0.000663:1:1:1|27:94535.936781:273465.708904:2400:-15565:22775:-648.096319:-15565:22775:-648.096319:3:-0.010387:0.884315:0.005482:1:1:1|28:77729.730248:299168.64707:1433.807363:-12917.018695:20439.356978:-1045:-12917.018695:20439.356978:-1045:1:-0.018127:0.866795:0.010419:1:1:1|29:68701.899391:314344.42286:310:-7875:23995:-1420:-7875:23995:-1420:3:-0.022742:0.809566:0.016472:1:1:1|30:54966.649397:335499.937015:-3430:-28820:13555:-1870:-28820:13555:-1870:3:-0.028614:0.975518:0.006393:1:1:1|31:38620.163433:342276.538305:-3430:-27564.07396:7485.894318:-450:-27564.07396:7485.894318:-450:1:-0.007617:0.992445:0.00094:1:1:1|32:-161.498522:350471.725651:-4330:-32840.081716:6651.730847:-575:-32840.081716:6651.730847:-575:1:-0.010566:0.995761:0.000969:1:1:1|33:-27060:355580:-4580:-27398.141545:6556.999607:-320:-27398.141545:6556.999607:-320:3:-0.00564:0.993094:0.000665:1:1:1|34:-57308.834978:364135.314824:-4970:-26942.260952:419.873886:575:-26942.260952:419.873886:575:1:-0.010689:-0.999894:-0.000105:1:1:1|35:-80944.521904:356419.747771:-3430:-22509.508227:-11283.904761:2250:-22509.508227:-11283.904761:2250:1:-0.0446:-0.973528:-0.010259:1:1:1|36:-102327.851431:341567.505301:-470:-9586.132678:-16898.901677:2518.074249:-9586.132678:-16898.901677:2518.074249:3:-0.055649:-0.862326:-0.032412:1:1:1|37:-103598.20852:319984.163022:1606.148499:891.154716:-23745.116709:1038.074249:891.154716:-23745.116709:1038.074249:1:-0.014513:-0.690673:-0.01519:1:1:1|38:-100545.542:294077.271883:1606.148499:3216.022492:-25239.909893:0:3216.022492:-25239.909893:0:1:0:-0.660209:0:1:1:1|39:-97166.163536:269504.343236:1606.148499:3385:-28135:0:3385:-28135:0:3:0:-0.663532:0:1:1:1|40:-93348.3141:237152.196538:1606.148499:3116.993337:-31392.171617:36.925751:3116.993337:-31392.171617:36.925751:1:-0.0004:-0.670438:-0.000443:1:1:1|41:-90932.176861:206720.000003:1680:603.049049:-25896.725236:36.925751:603.049049:-25896.725236:36.925751:1:-0.000485:-0.693767:-0.000504:1:1:1|42:-92142.216003:185358.746065:1680:-2880:-22480:-220:-2880:-22480:-220:3:0.003643:-0.750683:0.003206:1:1:1|43:-95547.238822:161759.999984:1240:-4848.985248:-29912.099662:-220:-4848.985248:-29912.099662:-220:3:0.002183:-0.789728:0.001695:1:1:1|44:-105495.41744:138729.999991:1240:-14475.177551:-24404.999951:-0:-14475.177551:-24404.999951:-0:3:0:-0.837495:0:1:1:1|45:-117448.371629:112949.999796:1240:-5790:-31660:0:-5790:-31660:0:3:0:-0.768081:0:1:1:1|46:-117776.902784:75410.000649:1240:8947.122162:-36382.710611:0:8947.122162:-36382.710611:0:1:0:-0.617663:0:1:1:1|47:-99554.127305:40184.578574:1240:26512.253841:-33687.550858:-434.291971:26512.253841:-33687.550858:-434.291971:1:0.001808:-0.438363:0.003708:1:1:1|48:-64752.395102:8034.898932:371.416057:49522.461514:-3417.002431:0:49522.461514:-3417.002431:0:3:0:-0.034438:0:1:1:1|