rdTexTools Tutorial 2 – Optimizing Megascans 3D Surface Materials
Last Updated: 17th April 2023
Tutorial created with rdTexTools v1.00
Note: Megascans has added channel packing as a default option for a lot of their textures now, including the Bridge used in this tutorial.
This tutorial was written for older style MS materials, or MS materials downloaded from UE4/5 in non-packed ways.
It is also compatible with many other types of textures you can find on the internet or the marketplace, so following this tutorial can still be very helpful in learning how to reduce memory by channel packing.
You can optimize the newer MS textures too, step 6 in this tutorial shows some options.
Introduction
Quixel and Epic have provided us with some excellent high quality assets with their Megascans collection.
They have very high detail and high resolution textures. This is great because we get to choose the level of detail we can have in our games. The more optimized each asset is, the more of them we can have in-game.
This tutorial shows you how easy it is to get a huge reduction of resource space, both disk and GPU by using rdTexTools to optimize Megascans Surface textures.
The same principles apply to all textures, so the same steps can be used to optimize your surface textures from anywhere.

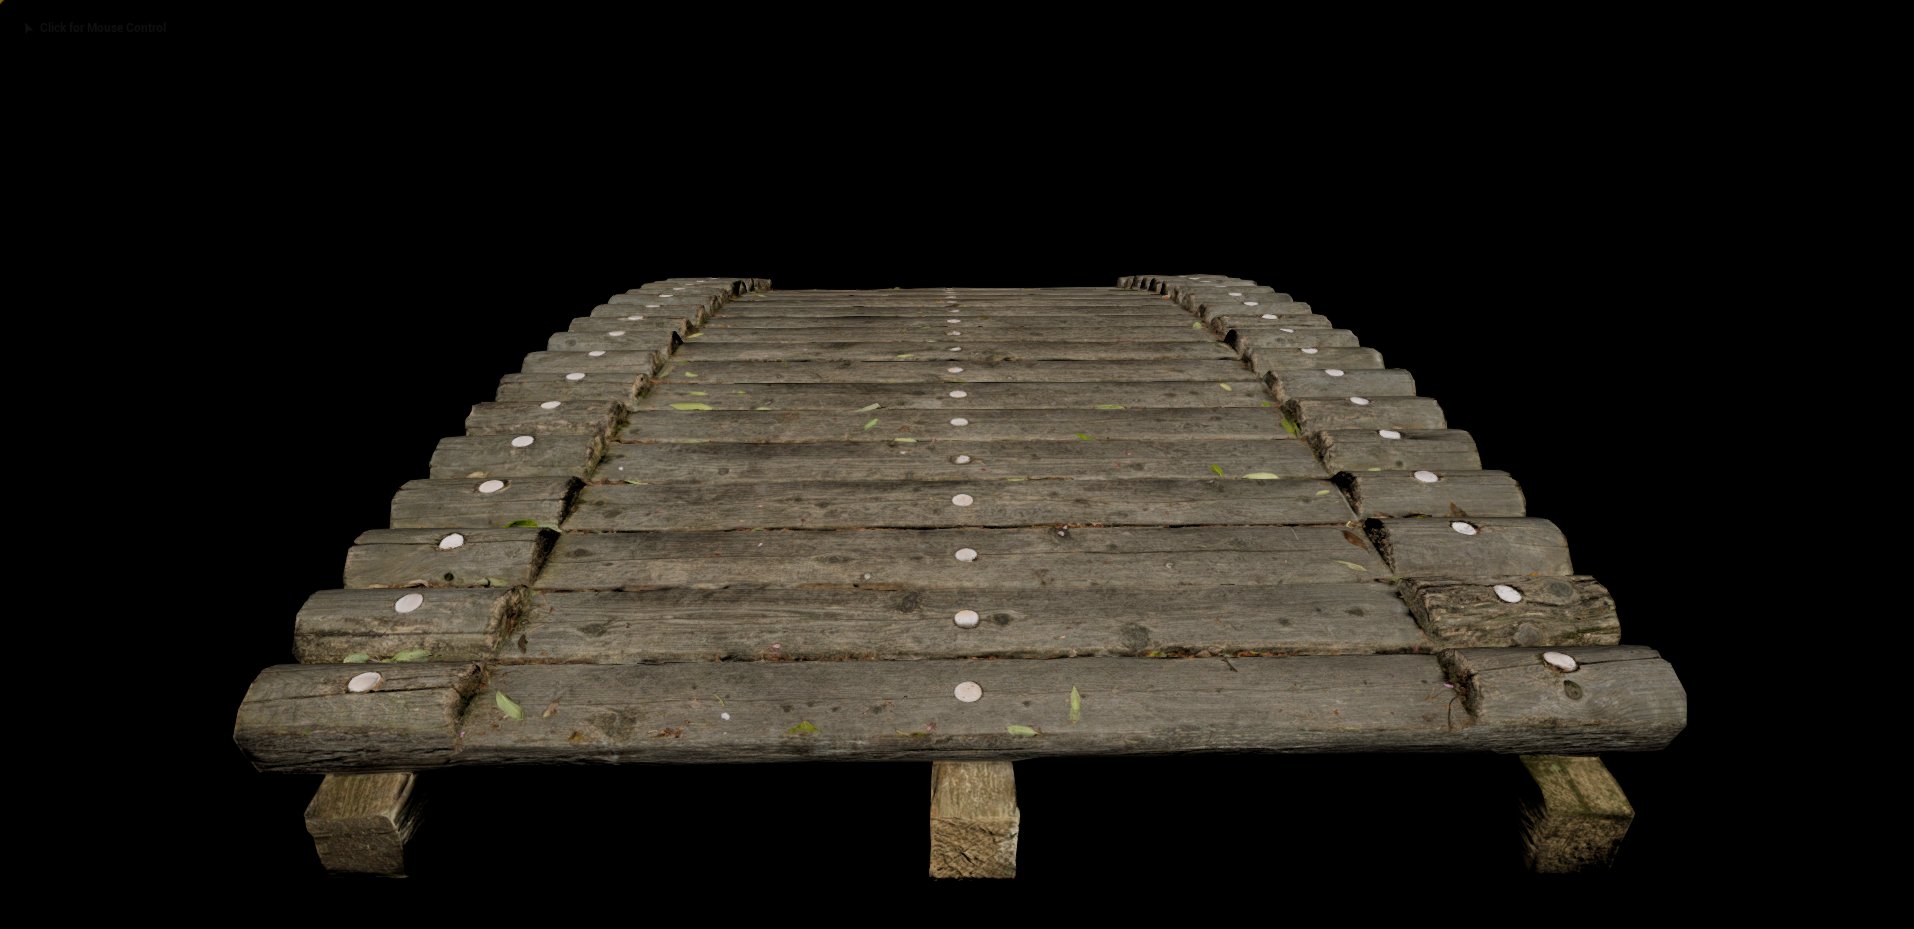
This tutorial optimizes the textures used for the Megascans Japanese Arched Bridge. It’s using the 8K textures from the original which are then forced to a lower LOD bias to take less space afterwards.
The textures for this mesh are:
Diffuse – RGB, 42.67Mb GPU, 101.92Mb disk
Normal – RGB, 85.33Mb GPU, 137.6Mb disk
Specular – Grey, 42.67Mb GPU, 53.23Mb disk
Rough – Grey, 42.67Mb GPU, 40.06Mb disk
Cavity – Grey, 42.67Mb GPU, 71.26Mb disk
Displace – Grey, 42.67Mb GPU, 40.92Mb disk
Total – 298.68Mb GPU, 444.99Mb disk
The goal is to get the texture sets down to around 5Mb for each asset.
This is a good size for having a large amount of varied assets on the highest end graphics hardware out in 2021/2022. Most cards have about 8Gb GPU memory – the higher end ones can have up to 24Gb (GTX3090ti).
- The XBox 1 has 8Gb GPU memory
- The PS4 has 8Gb memory shared memory with the CPU
- The XBox X series has around 10Gb usuable GPU memory (it has 16Gb shared memory with the CPU).
- The PS5 has 16Gb shared memory with the CPU
This is the maximum size of course, for older hardware there are the scalability options to lower textures sizes and other performance tweaks.
Each game/project differs so you’ll need to consider your projects attributes to find the best sizes.
Using the scalability, I find having the texture sets at around 800Kb to 1Mb on older hardware (e.g. GTX1080ti which has 11Gb but slower bandwidth) gets a good number of objects on screen without draining too many resources.
If the asset is a feature in game rather than background scenery it can be higher resolution as the players attention will be focused on it more.
Step 1.
The first step is to create a Material Blueprint for the textures – you can use the standard MS materials or create one like below. This Material uses the cavity map to multiply the specular with (to reduce specular in shadowed areas) and as a simple AO map as this asset does not come with one.
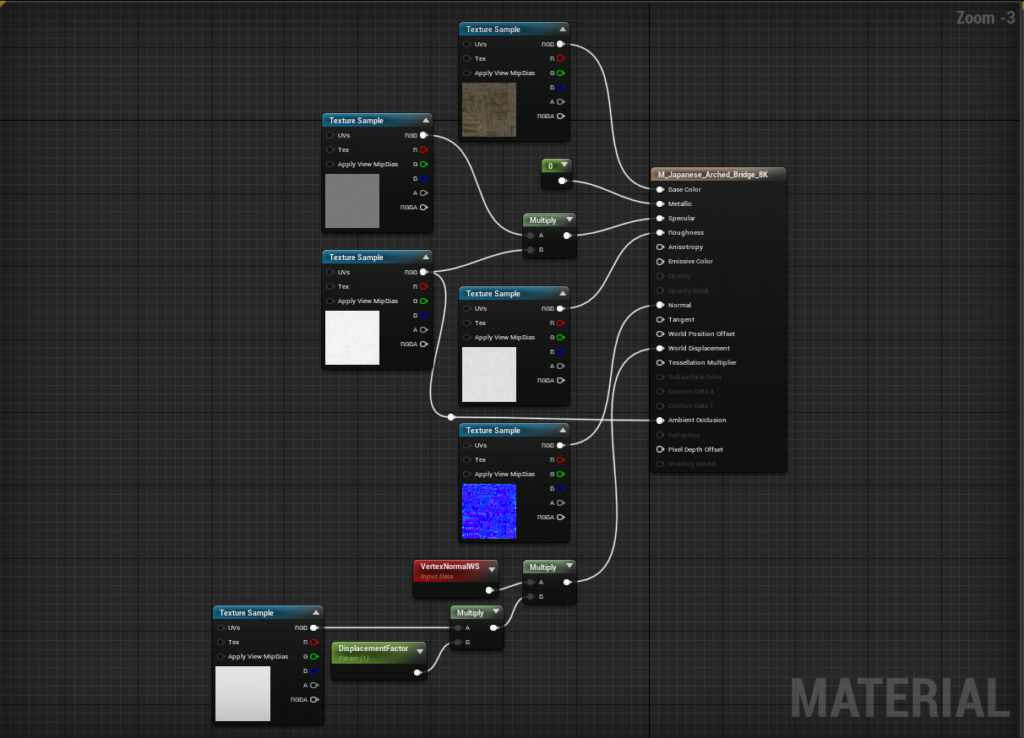
I’ve added Tessellation too (The Material has Tessellation set to PN_Triangles), in this example it’s probably overkill but is useful for the principles involved.
Step 2.
The first step into optimizing the textures is to compare our source textures to each other to find if there are any that are repeating information (either the same, or a constant shift up or down).
Sometimes a Cavity map is just the Blue channel of the Tangent based Normal, so we can do a “CreateDiffMap” on the Blue Normal channel and the Cavity map. We can see from the stats that they are quite different for our maps here (Megascans Cavity maps have much more detail). So if you’ve got plenty of GPU space it’s best to use that.
If you’re really wanting to save a lot of space, you can just use the Normal maps Blue channel instead of the Cavity map. This is what we will do.
When you are optimizing your project, go through and check any textures that look similar visually with the “CreateDiffMap” tool to see if you can remove any that are very close.
Step 3.
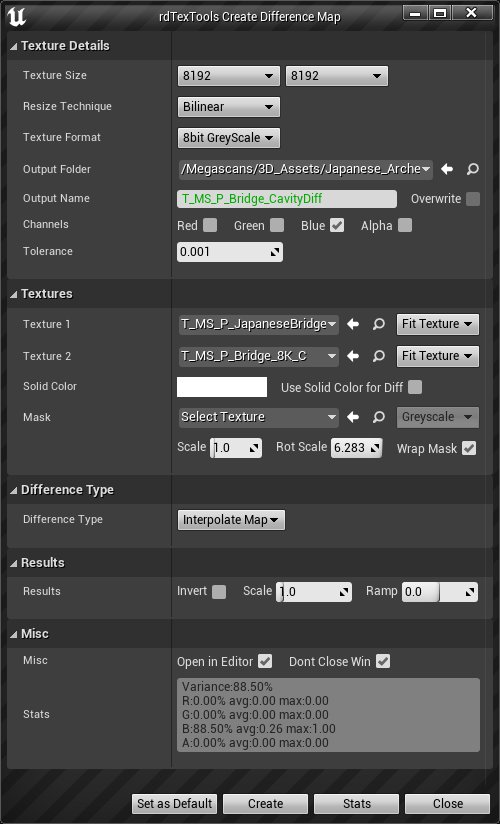
As we are using the Normals Blue channel as a simple AO map we can use the “CreateDiffMap” tool to multiply out the Specular map with the Cavity map and use the result of that instead of doing it in the material blueprint. This reduces the amount of light reflection within shaded areas of your mesh.

- Open the Specular map in the UE Texture Editor and select “CreateDiffMap” from the rdTexTools toolbar menu.
- Select 8K for the resolution, 8bit Greyscale for the format and choose an output name for the new texture. As both source textures are 8K as well, the interpolation type isn’t important, otherwise select “Nearest Neighbor”.
- Select the Specular map as Texture 1 and the Cavity map as Texture 2
- Select “Multiplication Map” as the difference type.
- Now click “Create” to make the new map.
- Done!
Step 4.
Now we can start optimizing the textures. The first thing we can do is combine the Specular, Roughness and Displacement maps into one texture – there is a little bit of loss here as they are going into a BC1 compressed RGB texture which has 5bits of color data for the Red and Blue and 6bits of color data for the Green. The actual color data is still stored as 8 bit on the CPU side, so if you wanted 8bit data on the GPU you can just change the Compression type from the Texture Editor to one of the 8bit or float types – no need to recreate the textures themselves.
If you want you can also add the Displacement map to the Alpha channel. When you use an Alpha channel with your texture, it uses BC5 compression rather than BC1 – this makes it double the size in GPU memory. This actually works out to be the same amount of GPU memory as a BC1 no-alpha texture plus a BC4 Alpha texture (the smallest greyscale format) so it’s slightly more efficient to combine as the Alpha – one less texture sampler, a little less shader code and slightly less data setup for the CPU memory to GPU memory pipeline.
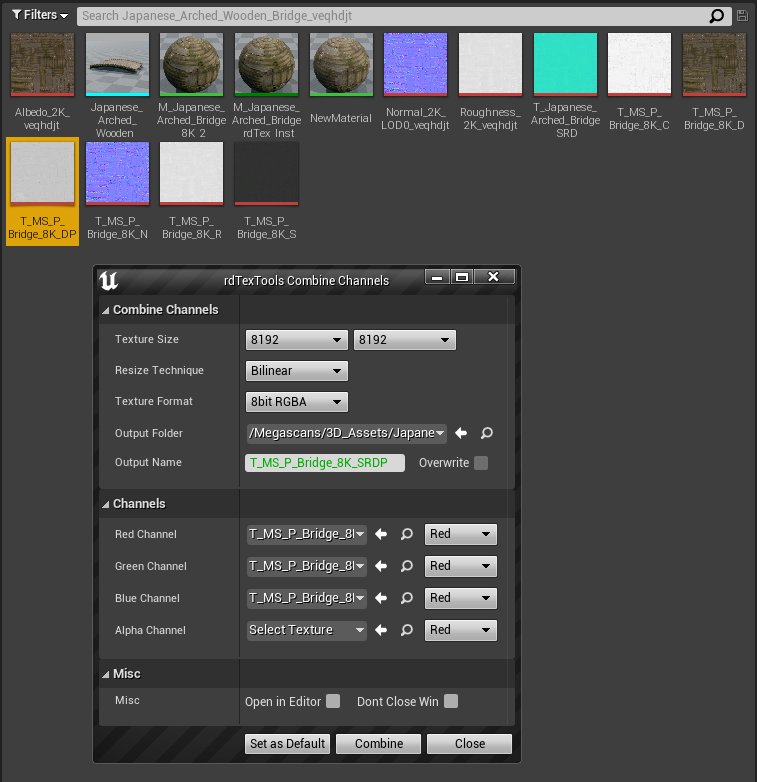
- Open one of the textures in the UE Texture Editor, then select the “CombineChannels” tool from the rdTexTools toolbar menu.
- Select the destination resolution you wish, in this example I’ve kept it the same size as the originals (8K).
- Select “8bit RGBA” for the format, and choose a filename for the destination texture.
- Select the Specular map for the Red Channel, the Roughness map for the Green Channel and the Displacement map for the Blue Channel.
- Now select “Combine” and the new texture will be created.
Step 5.
Now we can update our Material Blueprint.
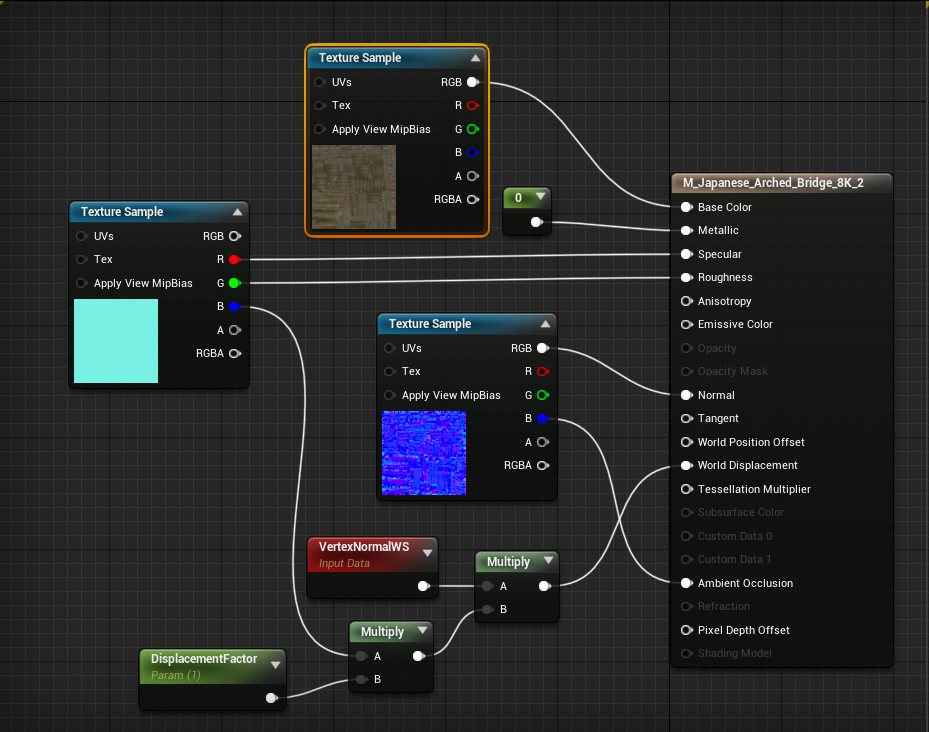
So that brings us down to 3 textures instead of the 6:
Diffuse – RGB, 42.67Mb GPU, 101.92Mb disk
Normal – RGB, 85.33Mb GPU, 137.6Mb disk
SRD – RGB, 42.67Mb GPU, 57.29Mb disk
Total – 170.67Mb GPU, 296.81Mb disk
or as a percentage, that’s 57% of the GPU memory and 66.7% of the disk footprint.
Step 6.
For a game, 170Mb of GPU memory is way too much for one mesh, and 8K is way over the top so now we can increase the LOD bias to make our textures use a smaller LOD.
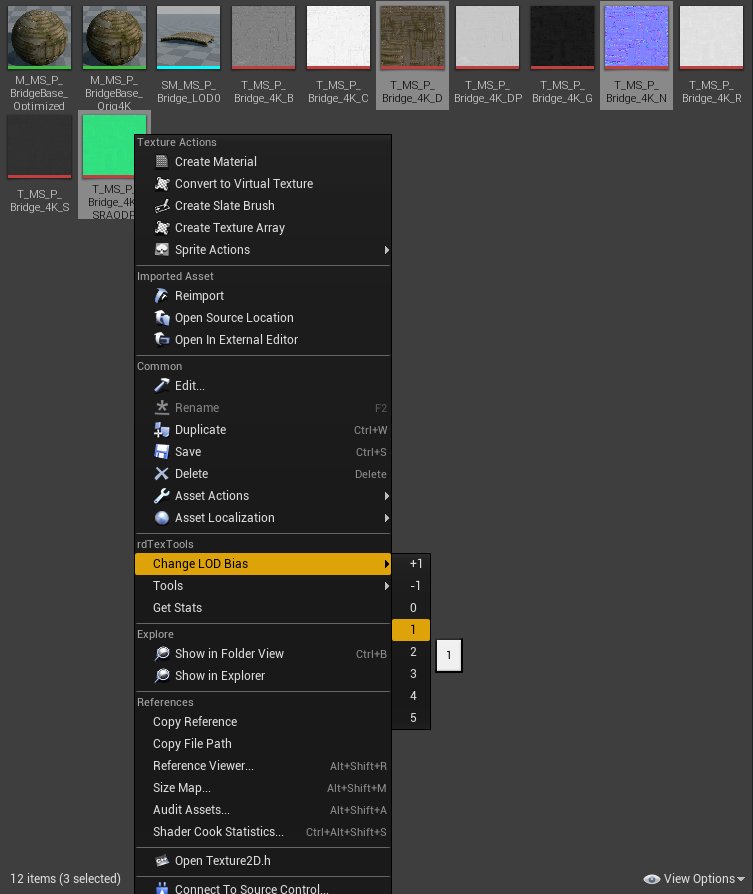
- Select the Albedo, Normal and newly create combined channel map (SRD)
- Right Click, go to the “Change LOD Bias” option in the rdTexTools section of the Context Menu and select “1” from the sub-menu.
- With them still selected, right click again and select “Get Stats” – Note that now the three textures are at 4K and taking 42.67Mb of GPU memory – a good start!
- Now change their LOD Bias to 2 – do a “Get Stats” and that’s now dropped to 10.67Mb – and are at 2K – almost there!
- Now deselect the Diffuse, and with the Normal and SRD maps selected – right click and select “+1” for the LOD Bias – those two maps will now be 1K and 1/4 the size while the Diffuse remains at 2K. Doing a “Get Stats” on the three textures now returns 4.67Mb – perfect!

This isn’t bad considering how much smaller it is, but it can be better. By changing the Mip-Map Settings in the Texture Editor for the textures can change how sharp or smooth the interpolation is.
Changing the Mip-Map Settings for the Normal to “Sharpen10” and changing the Diffuse to “Sharpen5” produces the results below.

If you still find that you’re not getting enough shading in your textures, you can also multiply the Cavity Map onto the Diffuse Map – that is explained in the MS Landscape Tutorial on page 7.