rdInst Tutorial 30 – Real-time Spline Splitting and Joining
Last Updated: 7th January 2024
Tutorial created using rdInst version 1.35
Download Project File (UE4.27 and above)
rdInst version 1.35 introduces tools to split and join splines at runtime.
This tutorial creates a Blueprint containing a spline, and splits and joins it repeatedly when played, drawing a line of randomly selected meshes (same mesh for each section of the spline).
Then we create a long spline, split it up and animate it close to the player.
Step 1. Create a new Blueprint with a SplineComponent
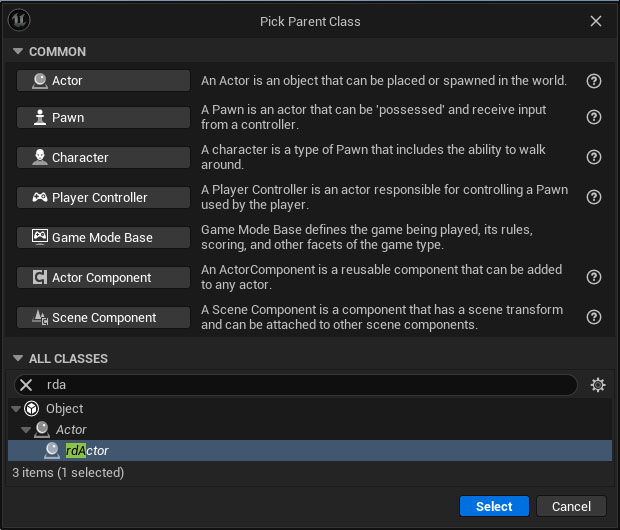
- Create a new Blueprint, Sub-classed from rdActor (in this example, called BP_TestSplines):
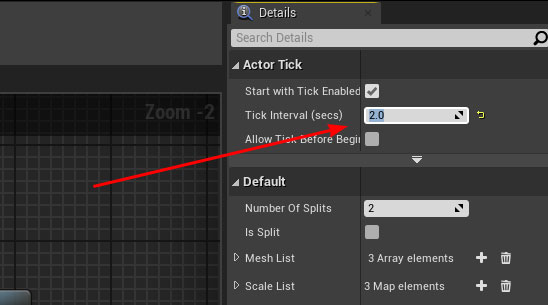
Open it in the Blueprint Editor, then in the Details panel for the class defaults, select “None” as the actor mode:

and change the tick interval to 2 seconds:
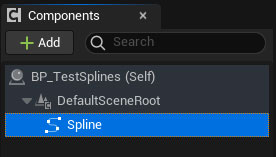
2. Add a SplineComponent to the Blueprint from the Component outliner.
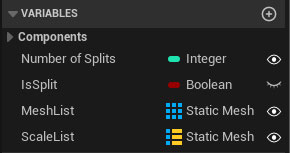
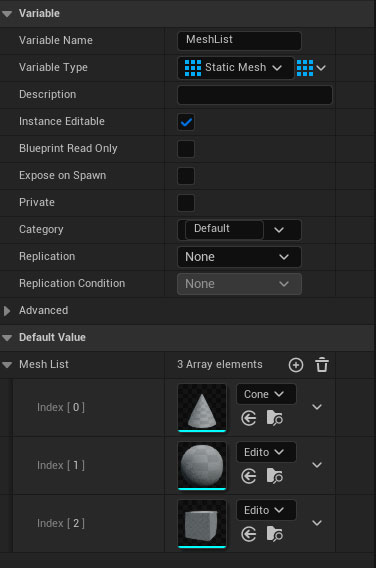
3. Now create the following variables in the Blueprint. The MeshList is an Array of StaticMeshes, the ScaleList is a Map of StaticMeshes as the Keys, and Vectors as the values:
4. Compile the Blueprint, and add 3 StaticMeshes to the MeshList, in this tutorial it’s using the Engines default Cone, Sphere and Cube, but you can use any.
5. Add 3 entries into the ScaleList – one for each of those meshes – set the Vector values to the same as the image below (or the scales you want for your own meshes):

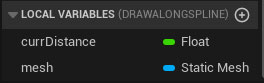
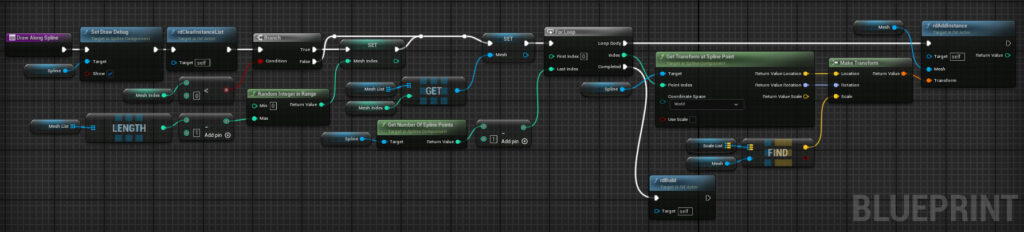
6. Now create a new function called “DrawAlongSpline”, and add the two local variables pictured here:
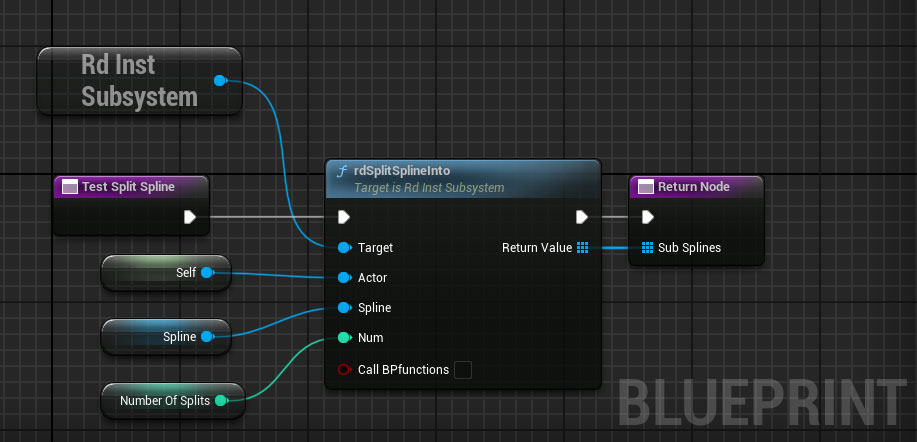
7. Create a new function called “TestSplitSpline” – tick the “Call in Editor” for the function in the details panel – then you can test it in the editor by clicking its button:
8. Create another function called “TestJoinSpline”, tick the “Call in Editor” and add the code below:
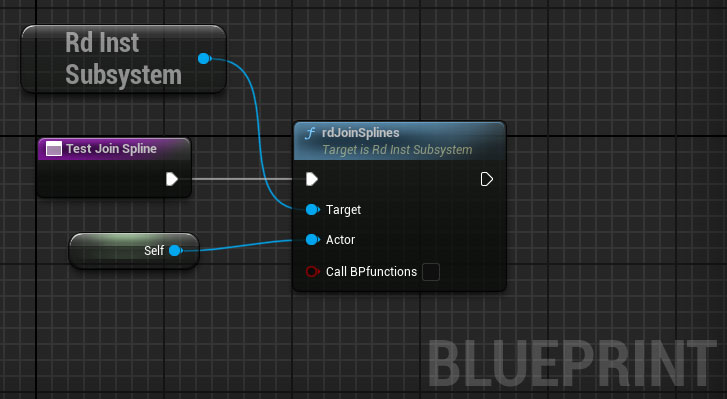
9. Now add the code as the image below shows:
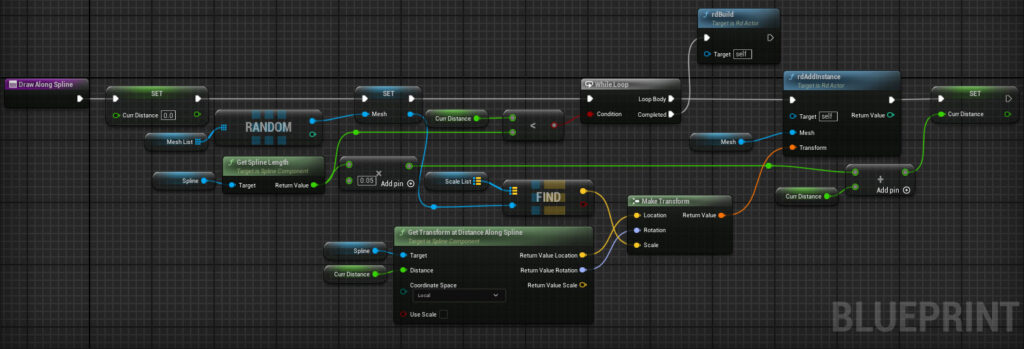
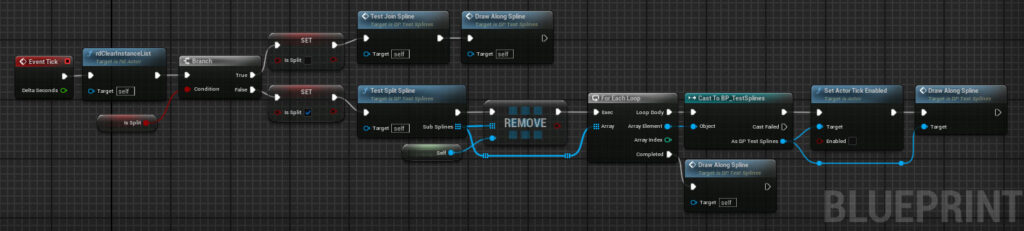
10. Go to the Event Graph, and add the code below for the Event Tick:
Note: we disable the tick on the subspline actors as they are duplicates of this BP and we don’t want them executing this code as well.
Step2. Drag the Blueprint into your level, and edit the Spline
We just need to create a path for the spline with some points, if you have rdSplineTools, you can copy the text below, then use the “Create Spline from Clipboard” tool to create the spline – otherwise, just manually add points and create a shape using at least 8 points.
rdSplineData|1|10|0:0:0:0:100:150:0:100:150:0:-539916799:0:0:0:1:1:1|1:100:150:0:120:145:0:120:145:0:-539916799:0:0:0:1:1:1|2:240:290:0:140:55:0:140:55:0:-539916799:0:0:0:1:1:1|3:380:260:0:145:-270:0:145:-270:0:-539916799:0:0:0:1:1:1|4:530:-250:0:140:-345:0:140:-345:0:-539916799:0:0:0:1:1:1|5:660:-430:0:145:5:0:145:5:0:-539916799:0:0:0:1:1:1|6:820:-240:0:145:215:0:145:215:0:-539916799:0:0:0:1:1:1|7:950:0:0:130:200:0:130:200:0:-539916799:0:0:0:1:1:1|8:1080:160:0:140:0:0:140:0:0:-539916799:0:0:0:1:1:1|9:1230:0:0:150:-160:0:150:-160:0:-539916799:0:0:0:1:1:1|
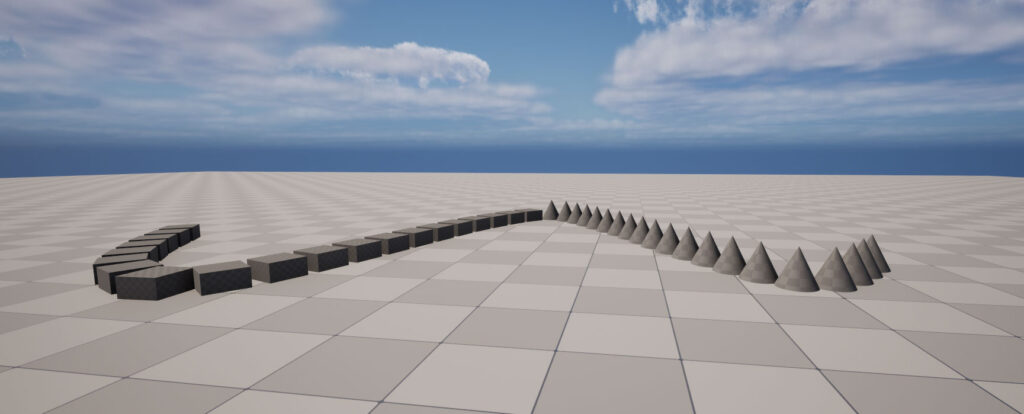
Step 3. Play the level
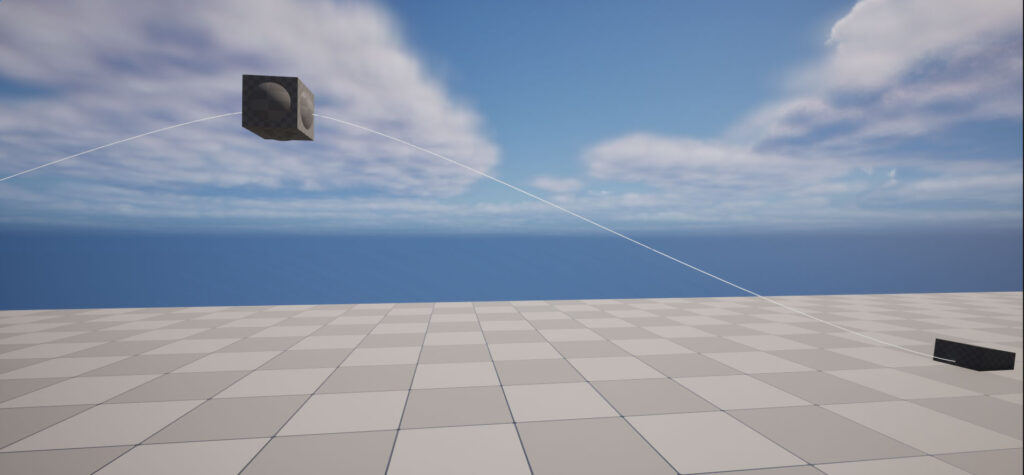
When you now play the level, you should see the spline populated with a random mesh from the list – each couple of seconds the spline changes from a full spline to split spline, each split is populated with a random mesh.
Step 4. Create a new Blueprint.
Now we’re going to create a spline that is split at BeginPlay, and only the closest sections to the player get moved (their Z is moved upwards calculated by the proximity of the player).
This Blueprint illustrates how moving an end-point on one of the subsplines updates the spline next to it as well – a new set of tangents is calculated based on both splines. You’ll notice that the end points are set as “custom curve” – this is a result of setting the tangents manually.
- Create another Blueprint (in this example, called “BP_TestSplines2”) subclassed from rdActor, set the “Actor Mode” to “None”, and add a Spline Component to it like in the previous step.
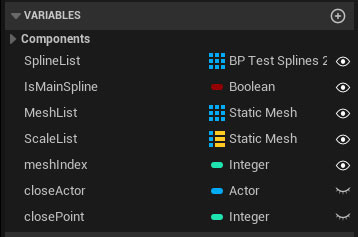
- Add the variables below to the class:
– the SplineList is an Array of BP_TestSplines2 references
– the MeshList is an Array of StaticMeshes (the same as the previous blueprint)
– the ScaleList is a Map of StaticMeshes as Keys and Vectors (containing scale values) as the Values
– meshIndex should have a default of -1
3. Add the Meshes and Scales to the defaults to the Array and Map like in Step 1.
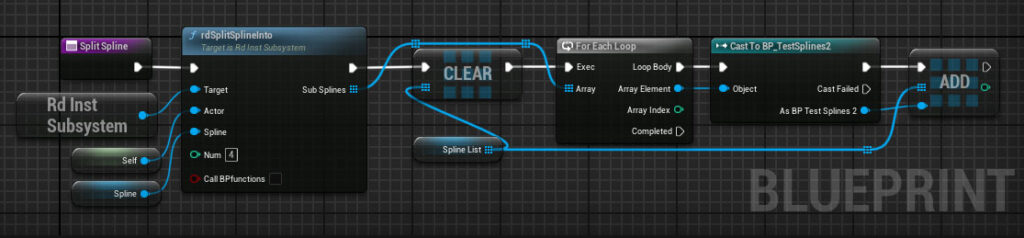
4. Create a Function called “SplitSpline” – tick the “Call In Editor” tickbox in the details, add the code as below:
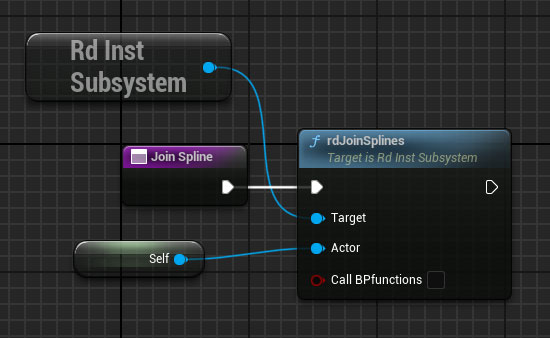
5. Create a Function called “JoinSpline” – tick the “Call In Editor” tickbox and add the code:
6. Create another Function called “DrawAlongSpline” and add the following local variables:
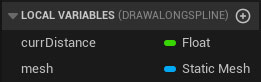
Add the following code:
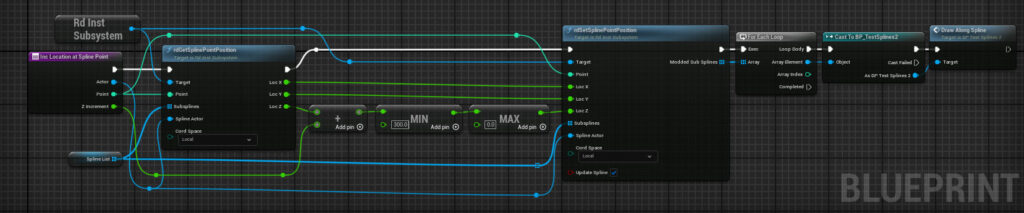
7. Create another Function called “IncLocationAtSplinePoint” and add the code:
Now we add the code for the events:
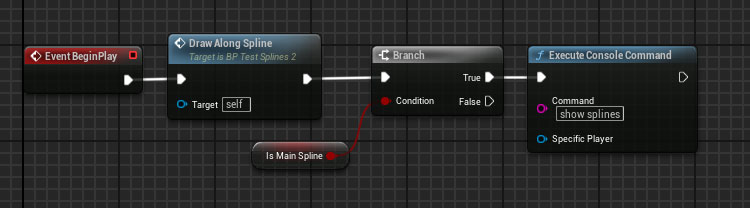
8. Add the following code to the BeginPlay event:
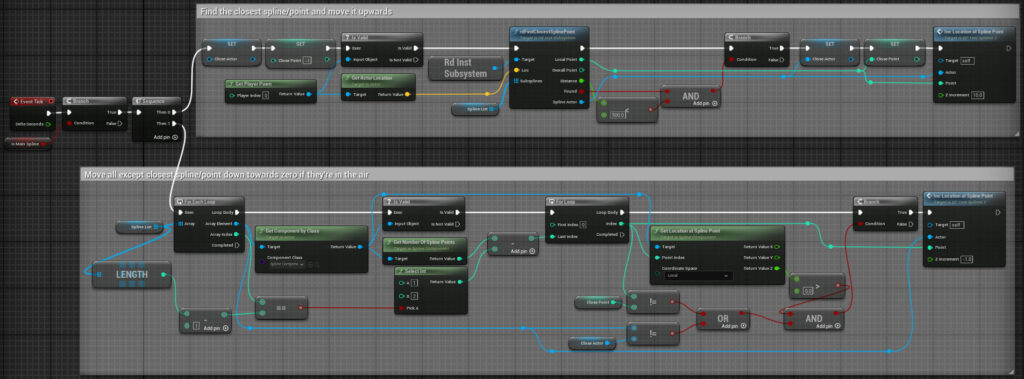
9. Add the following code to the EventTick event:
That’s it, now we just need to set it up in the map.
10. Drag the new blueprint into your level and create a straight spline subdivided into a good amount of points, use this spline if you wish in the same way as in Step 1.
rdSplineData|1|21|0:0:0:0:853.80911:-0.000008:0.000003:853.80911:-0.000008:0.000003:1743307267:0:0:0:1:1:1|1:853.80911:-0.000008:0.000003:853.8091:-0.000008:0.000003:853.8091:-0.000008:0.000003:1743307265:0:0:0:1:1:1|2:1707.618201:-0.000016:0.000006:853.809041:-0.000008:0.000003:853.809041:-0.000008:0.000003:1743307265:0:0:0:1:1:1|3:2561.427193:-0.000024:0.000009:853.809021:-0.000008:0.000003:853.809021:-0.000008:0.000003:1743307265:0:0:0:1:1:1|4:3415.236242:-0.000032:0.000012:853.809205:-0.000008:0.000003:853.809205:-0.000008:0.000003:1743307265:0:0:0:1:1:1|5:4269.045602:-0.00004:0.000015:853.809331:-0.000008:0.000003:853.809331:-0.000008:0.000003:1743307267:0:0:0:1:1:1|6:5122.854904:-0.000048:0.000018:853.809052:-0.000008:0.000003:853.809052:-0.000008:0.000003:1743307265:-0:-0:-0:1:1:1|7:5976.663707:-0.000056:0.000021:853.80879:-0.000008:0.000003:853.80879:-0.000008:0.000003:1743307265:-0:-0:-0:1:1:1|8:6830.472485:-0.000064:0.000024:853.808975:-0.000008:0.000003:853.808975:-0.000008:0.000003:1743307265:-0:-0:-0:1:1:1|9:7684.281657:-0.000072:0.000027:853.809236:-0.000008:0.000003:853.809236:-0.000008:0.000003:1743307265:-0:-0:-0:1:1:1|10:8538.090956:-0.000079:0.00003:853.809343:-0.000008:0.000003:853.809343:-0.000008:0.000003:1743307267:-0:-0:-0:1:1:1|11:9391.900343:-0.000087:0.000032:853.809299:-0.000008:0.000003:853.809299:-0.000008:0.000003:1743307265:-0:-0:-0:1:1:1|12:10245.709554:-0.000095:0.000035:853.80889:-0.000008:0.000003:853.80889:-0.000008:0.000003:1743307265:-0:-0:-0:1:1:1|13:11099.518122:-0.000103:0.000038:853.808536:-0.000008:0.000003:853.808536:-0.000008:0.000003:1743307265:-0:-0:-0:1:1:1|14:11953.326626:-0.000111:0.000041:853.808727:-0.000008:0.000003:853.808727:-0.000008:0.000003:1743307265:-0:-0:-0:1:1:1|15:12807.135575:-0.000119:0.000044:853.809045:-0.000008:0.000003:853.809045:-0.000008:0.000003:1743307267:-0:-0:-0:1:1:1|16:13660.944715:-0.000127:0.000047:853.809204:-0.000008:0.000003:853.809204:-0.000008:0.000003:1743307265:-0:-0:-0:1:1:1|17:14514.753983:-0.000135:0.00005:853.809299:-0.000008:0.000003:853.809299:-0.000008:0.000003:1743307265:-0:-0:-0:1:1:1|18:15368.563314:-0.000143:0.000053:853.809315:-0.000008:0.000003:853.809315:-0.000008:0.000003:1743307265:-0:-0:-0:1:1:1|19:16222.372613:-0.000151:0.000056:853.809299:-0.000008:0.000003:853.809299:-0.000008:0.000003:1743307265:-0:-0:-0:1:1:1|20:17076.181912:-0.000159:0.000059:853.809299:-0.000008:0.000003:853.809299:-0.000008:0.000003:1743307267:-0:-0:-0:1:1:1|11. Now split the spline by clicking on the “Split Spline” button in the Details panel with the blueprint selected in the level. This will split the spline into 4 subsplines:
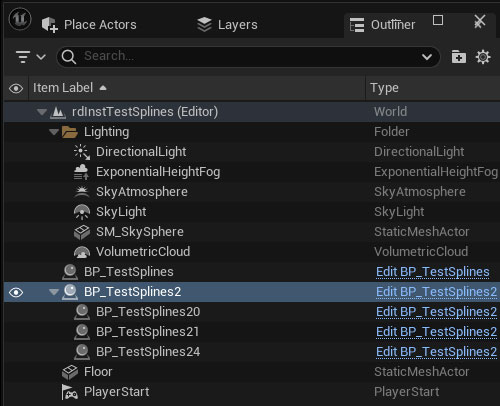
12. Now tick the “Is Main Spline” tickbox on the parent spline (BP_TestSplines2):
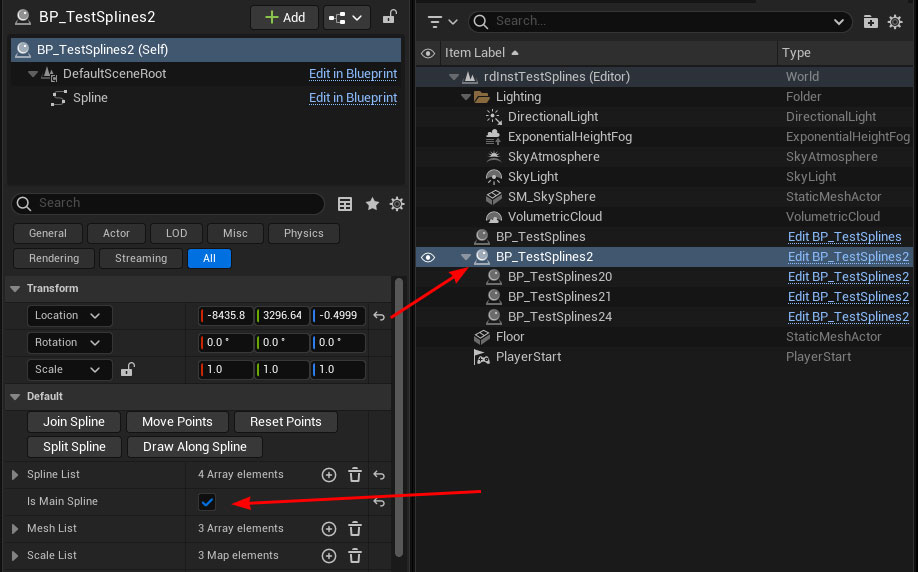
This is just a way to control all the subsplines from the main one – the code will only get executed in the parent Spline. Normally this type of code would be done from somewhere such as the player character.
That’s it – now just play the map – when you move close to the spline, the closest point moves upwards, slowly falling back down when you move away. Note that the adjacent splines also pick up the height and correct tangents when an end point is moved: