rdInst Tutorial 33 – The rdSpawnStuff Actor
Last Updated: 25th February 2024
Tutorial created with rdInst version 1.35
Download Tutorial project (UE5.3 up)
The rdSpawnStuff Actor is the culmination of most of the functionality of rdInst. It combines the fast StaticMesh Instancing with fast Actor Spawning, Actor Pooling, Distributed Transactions and the Proxy system.
It spawns Actors, Prefabs, StaticMesh Instances, AI, PCG volumes, rdPopulate volumes and probably the most powerful of all – more rdSpawnStuff Actors.
You can populate entire galaxies using this spawn system – You would have a Galaxy rdSpawn Actor which then spawns SolarSystem rdSpawnStuff Actors which then spawn planet spawners – continent spawners – all the way down to spawning Forests, vegetation, buildings and AI powered people, robots and animals close to the player.
The system supports Large World Coordinates on UE5 and the distances between spawn points can be the full extent.
It works equally well in smaller scale worlds – perfect for spawning your AI and populating streamed areas.
The spawning works incredibly quickly if you use the StaticMeshInstance Proxy system – then instead of spawning a large amount of actors, it just adds Instances to the ISM manager – swapping in a small amount of actors that are in close proximity. This is not only a huge FPS saver, it means you only have to pool small amounts of actors so is a big memory optimization too.
There are numerous ways of spawning things:
- The rdPopulation system
- Lists of Actors/Instances/Prefabs etc
- PCG Volumes
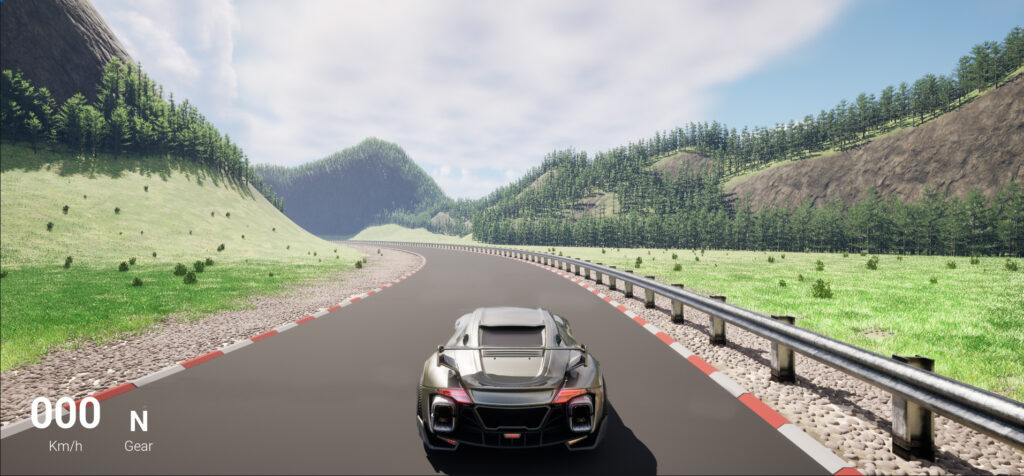
Anyway – enough hype, in this tutorial we will create a long landscape and spawn stuff along it as we drive along it.
It’s based off the Vehicle Template. The downloadable project for this tutorial is 5.3 and up.
A New SpawnActor type is created, Subclassed from rdSpawnStuffActor – it has a spline, and crowds of people are placed along them.
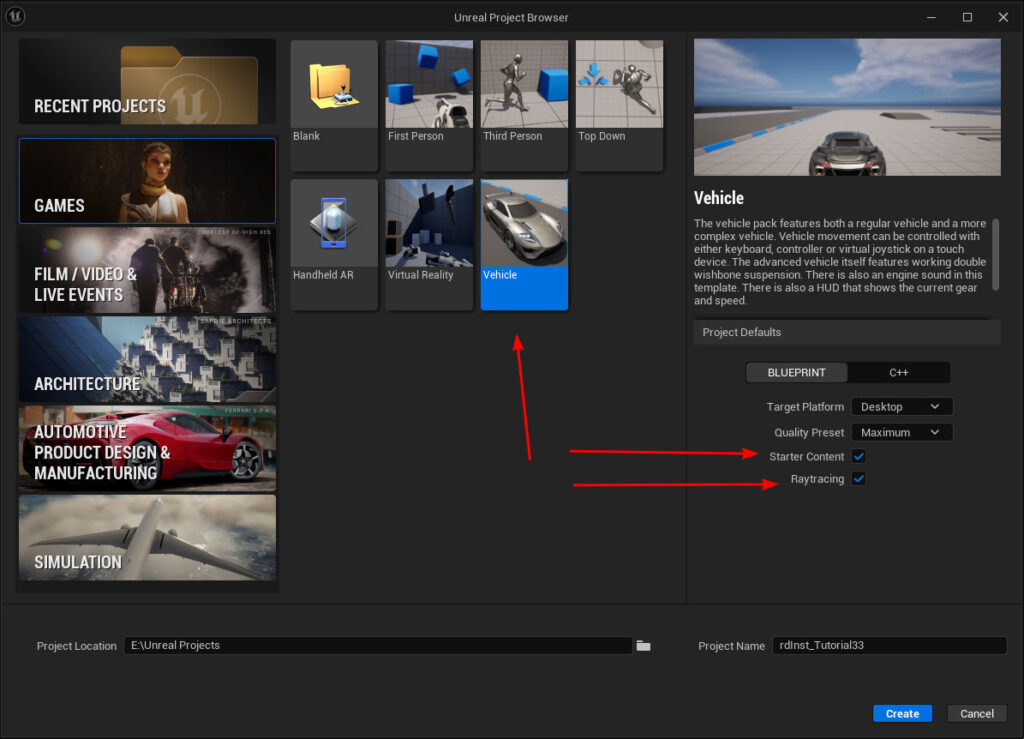
Step 1. Create a new Project based on the Vehicle Template
The first step is to create a new project – this tutorial uses the vehicle template, so base it from that.
Add the “Start Content” – we’ll use some of the materials. If you have a RTX card, enable Hardware Raytracing too.
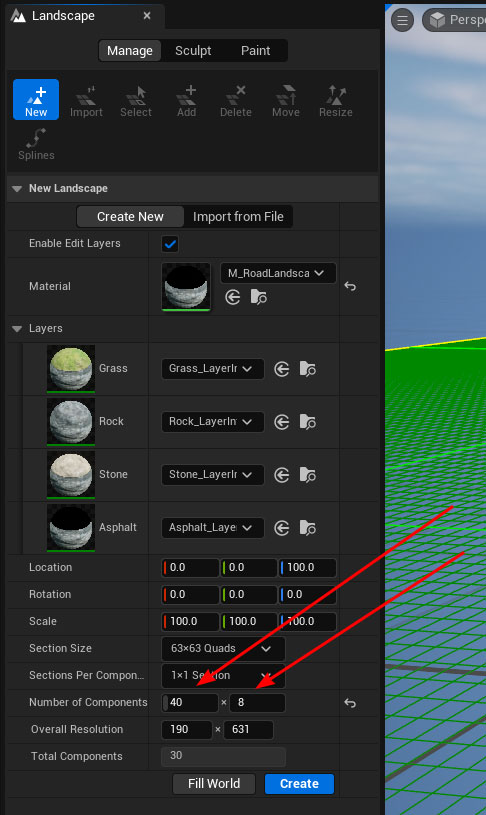
Step 2. Create a new level and a landscape
Now create a new level (based of the Basic template)
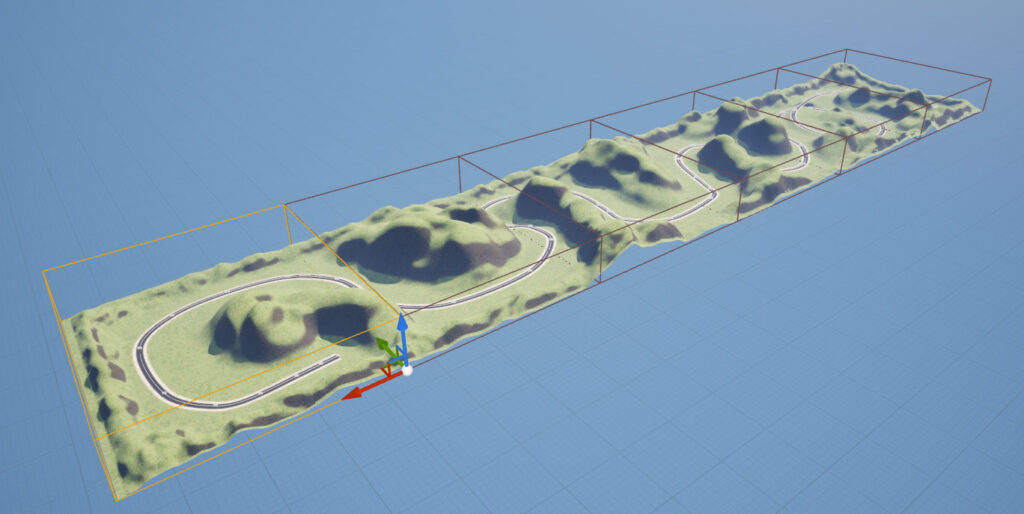
Delete the floor and add a landscape – if you have a heightmap load one from there. For this tutorial the landscape is long and thin, the landscape has all the default settings except for the “Number of Components” values, which are changed to 40 x 8.
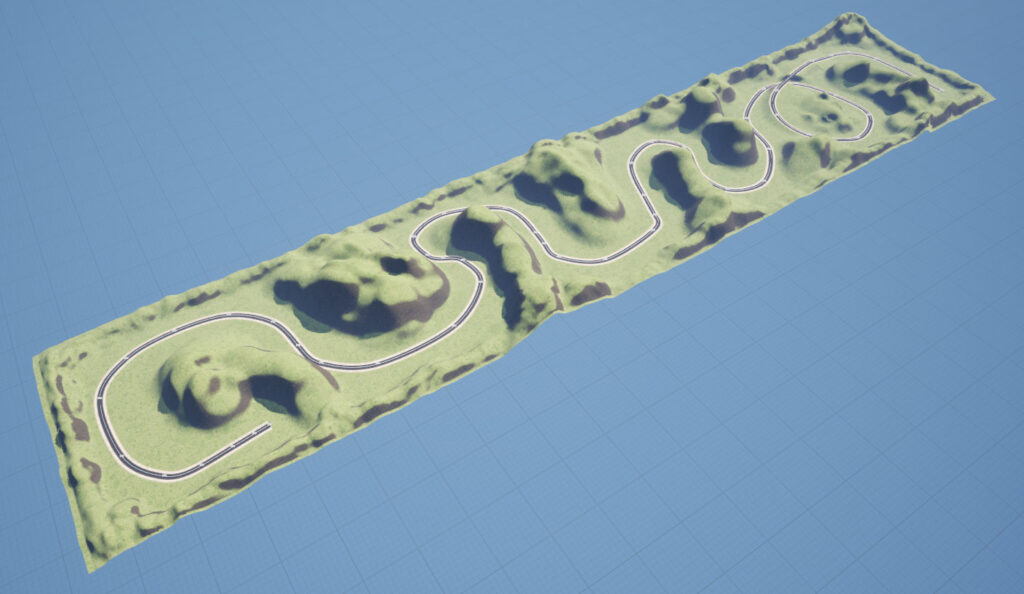
Step 3. Create the RoadSpline Blueprint and add to the level
The project downloads at the top of the page have links to download either the complete project, or just the road Blueprint – it basically just calls the rdPopulateSpline routine to add meshes along it. It also has a Bool variable to turn off rendering (makes editing it quicker).
Add the Road Blueprint to the level and drag out the spline points to create a race track around the level. The tutorial uses 4 road meshes, one with no rails, one with them on the left, one on the right and one with both. If you have rdSplineTools you can split the spline at any point to create sub-splines – then change the mesh used within that area.
Step 4. Create the Procedural Populators
Now we add some foliage. Add a rdProceduralActor to the level and use the “Snap to Landscape” button to make it the size of the landscape. Add some trees to the SpawnData items list and test by clicking the “Rd Spawn Stuff” button.
We want the foliage around the hills and not so much around the road and the flats – it would be possible to filter by the landscapes physical materials, but we’re going to make a SplatMap so we can customize areas in the map.
To create the SplatMap, there are a couple of ways, the quickest is to go into “Orthographic:Top” view mode (the one that usually is “Perspective” in the top/left) and position the camera to show the entire map and take a screen snapshot. The other is to export the landscape heightmap (and the paint layers which give a good boundary for roads etc) and use those.
I just created a simple no-fuss splatmap from the paint layer export:

Just the red channel is used.
Note that if you want to use this SplatMap during runtime (in other words not baking the data) you must store it as an uncompressed texture (VectorDisplacementMap should suffice).
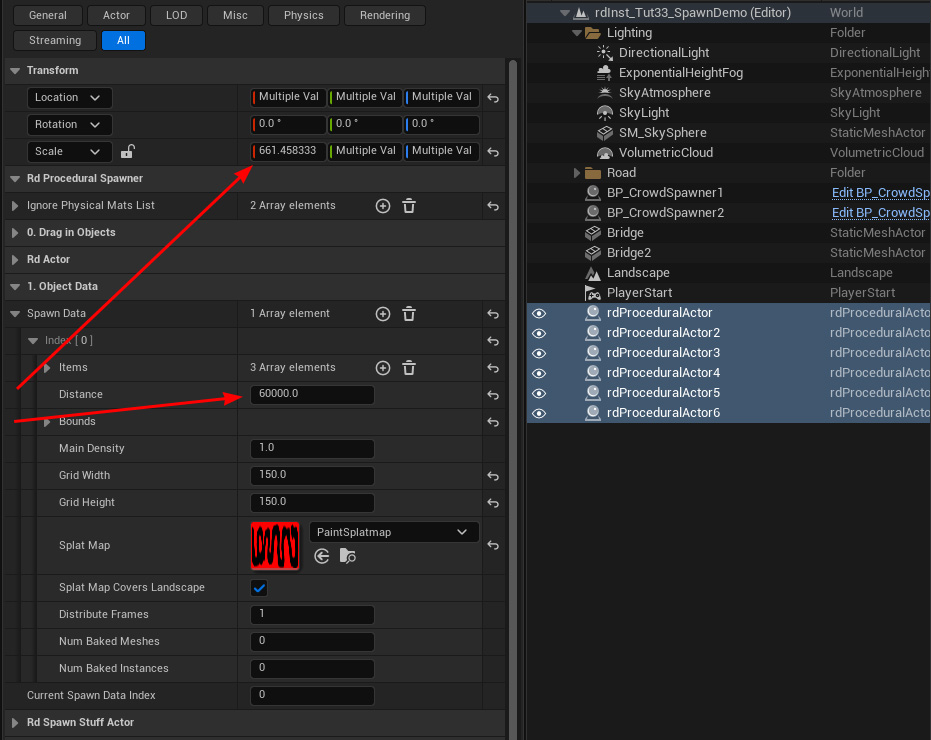
Add that to your SpawnData Placement and make sure “Splat Map Covers Landscape” is ticked – that makes it easy when we split our Populate Actor up into smaller areas by working out what part of the SplatMap to read.
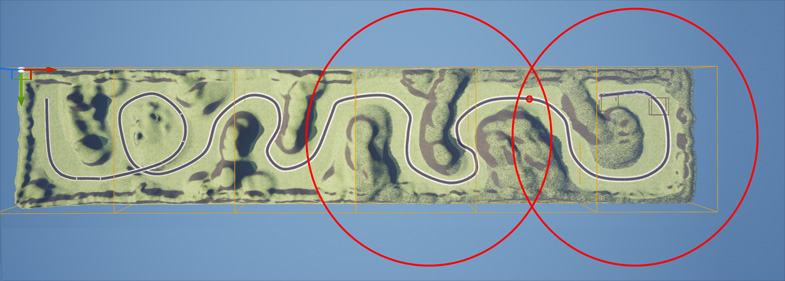
Once you’re happy with that, select the rdProceduralActor in the level, then in the details panel, click in the “Scale -> X” and type at the end of the value “/6” to divide the length by 6. Note the new value for x – that is the distance between the rdProcedural Actors in the level.
Now Alt+Drag that out to duplicate (along the X) and align to the first one. Do this 5 times to fill the landscape.
Now we want to set their spawn distance – we want to have at least the closest 2 showing around the player – 3 when closer to the center:
Select all the rdProceduralActors in the outliner and in the details panel, change the distance to around 100 times the value in the X Scale of the rdProcedural Actors.
Now with them still selected, click the “Rd Bake Spawn Stuff Data”. This stores everything in an optimal way for spawning and scanning for proxies.
In this tutorial, each section spawns around 36-50K instances and on the test machines didn’t cause any glitches when they swap in – it’s a bit extreme but good for a Epic Scalability level, using less for lower levels or distributing the spawn with the Distributed Transactions.
Right! That covers the landscape and using the rdPopulateActor to populate using a proximity spawn.
Step 5. Create a Custom Spawner for creating crowds of AI
The next step is to add crowds of AI people along the road that cheer when you get close.

To do this, we create a new Blueprint subclassed from rdSpawnActor – called it something like “BP_CrowdSpawner” and open it in the Blueprint Editor.
Add a SplineComponent to it – we’ll populate our crowd along that.
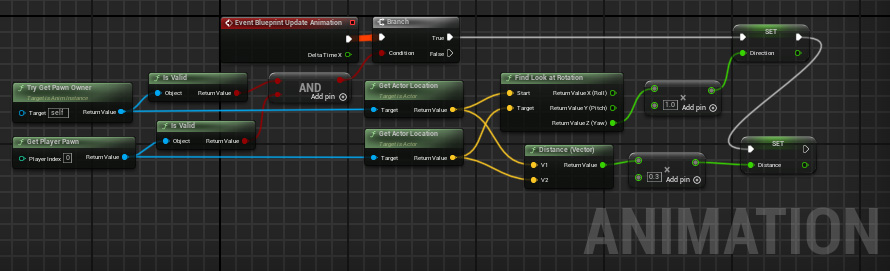
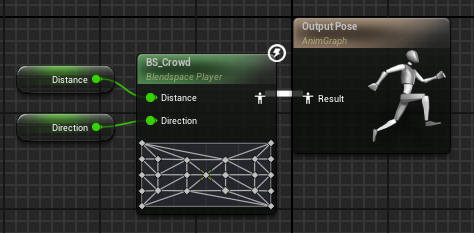
You’ll need to create an AI Blueprint along with an Animation Blueprint and a BlendSpace for the people – they lean in to the left or right depending on where the vehicle is – and start cheering when close. These are included in the Project Download – I won’t go into too much detail here, but this is what they look like:
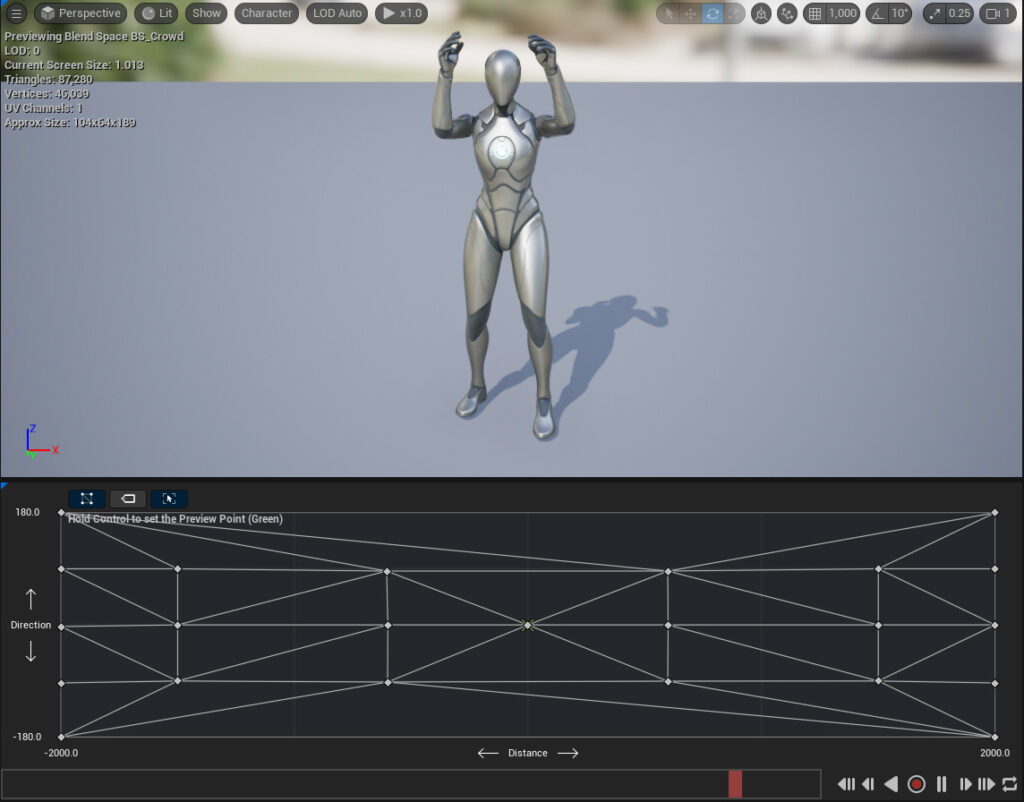
Four animations are needed – but easy to create:
1) Idle
2) Idle Leaning Left (rotate Spine1 to the left and forward)
3) Idle Leaning Right (rotate Spline1 to the right and forward)
4) Cheering (use the WalkInPlace animation and rotate the upper and lower arms up)
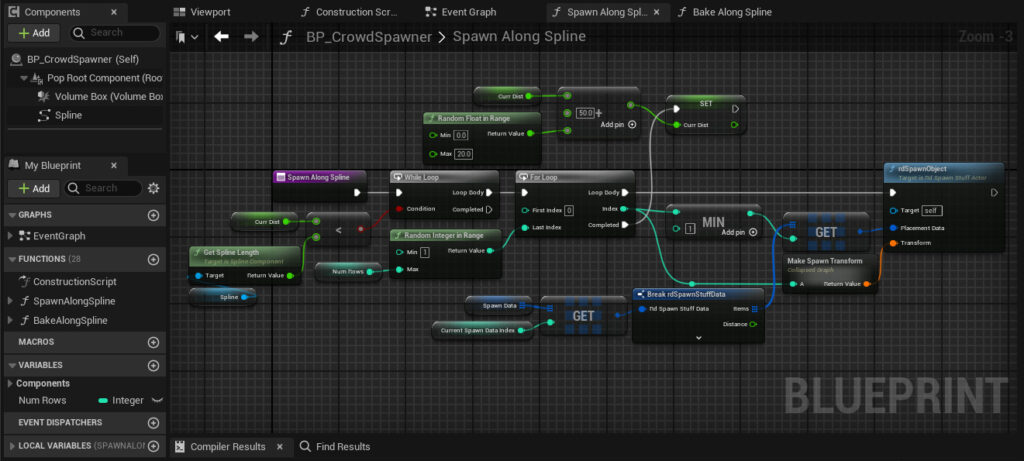
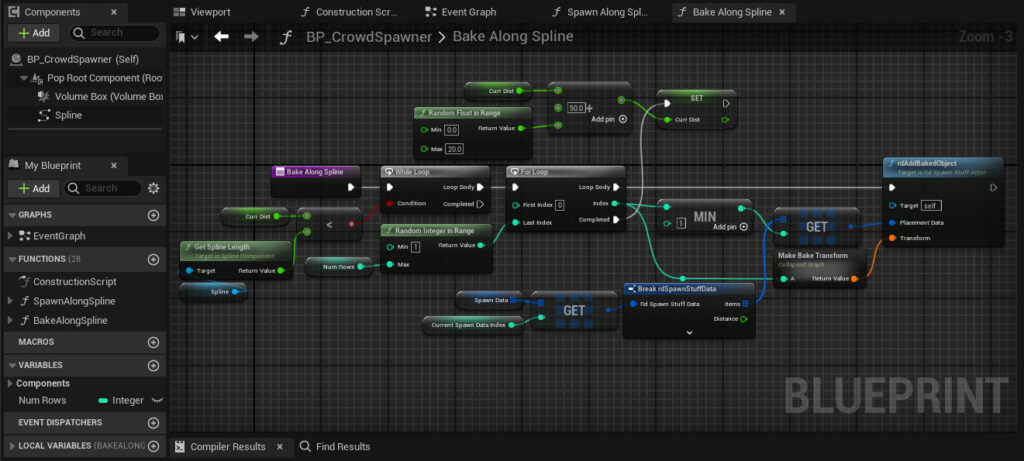
The next step is to create the code for the spawning. It basically just adds people along the spline with a random amount behind them and a slight random offset for each point. It uses 2 placement items – they both point to identical static meshes of the skeletal mesh of the third-person – one is used for the front row, the second for all subsequent rows. This allows us to just use a proxy for the first row to change to AI.
Create a variable first called “Num Rows” so you can customize each spline (make the default 1) – then add 2 new functions, “SpawnAlongSpline” and “BakeAlongSpline” – they’re identical apart from the last node. They both have an identical collapsed node which is shown below.
Now just add the Mannequin Skeleton to your AI BP and set its Animation BP to the one you created.
That’s all that’s needed for the AI Crowd person.
Step 6. Add the 2 Static meshes to the CrowdSpawner SpawnData Items list
Now we can add the meshes we created (we created a duplicate of the first) to the SpawnData items – click the (+) to add 2 items and set their meshes to the corresponding assets.
In the first one, set the Proxy Actor in the Proxy Settings to the AI BP and tick “UseSphereTrace”. Also tick “Pool” and set the “Number to Pool” to 300.